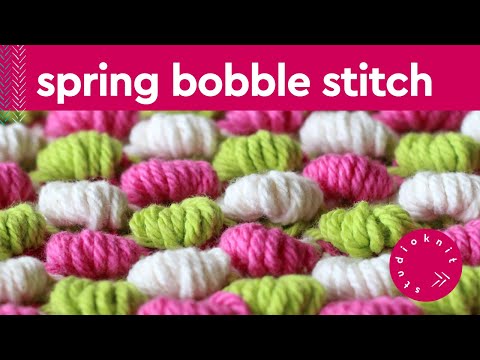
The Spring Stitch!
Hi, Guys!
I'm Kristen and welcome to Studio Knit.
Today, we are knitting up this really fun bobble stitch pattern.
It is called the Spring Stitch because we're making these little coils.
They're very springy, and super fun and unique to make.
You can do it in one color like I have here in this pretty Raspberry color, this is what
the wrong side looks like, very plain, and then you turn it over and it is full of all
of these really cute bobbles of the spring stitch.
And here I did it in three different colors.
You can get really creative.
I have a written pattern linked down in the description below, it's on my website and
you might want to go ahead and Pin this project to Pinterest, as well, to save for later.
I'm going to jump straight in to showing you how to make these little springs first.
And if you think this is going to be a fun one, and it is, please go ahead and hit LIKE,
it really helps me out.
For our materials, you can use any size yarn or needles, I'm using cotton worsted weighted
with size 7 knitting needles and of course scissors and a tapestry needle on hand.
Here we go!
The instructions are on the left and we begin the spring inserting the needle as if to knit
but we're not going to knit.
And I'm using the White color here to help differentiate what's going on on the left
and right needles.
What we do instead is we pull our needles apart and sort of hold them in this crisscross
sort of L shape X shape however you'd like to look at it.
And we're actually taking our working yarn, the white yarn, and we are wrapping it around
both needles ten times and we're doing it counter-clockwise, so you'll see I'm going
below to the left, around to the front and counting it ten times to wrap our yarn around.
Now, once we've done that, we take that working yarn and we put it onto that back needle as
if to knit.
Just as if we had done this without wrapping.
Okay.
Now, I'm going to be showing this three more times.
So, you'll definitely get a chance to see exactly what's going on here.
We're going to hold our working yarn in our right hand and then we're going to take that
right needle and I really like to hold it against my left needle until I'm able to catch
it and we are going to take everything off the left needle onto the right.
That's one stitch that we did with those ten yarn wraps right there in order to make our
springy coil.
The next step is to unravel that spring coil all along your yarn tail.
So you'll see it gets pretty long, and you end with like this little loop on your right
side.
And then, this is so fun, okay.
You take your yarn in your right hand.
Just the one yarn strand and we're going to cinch the coil by pulling the yarn tail.
So, holding onto the yarn, I'm going to pull onto the yarn tail, again, we're going to
do this again, and you're going to see that it starts to cinch up into this perfect little
coil.
Right there, that's the yarn that actually is closing in on itself and we cinch not too
tightly.
And then that's the Spring Stitch.
My next stitch here is a knit stitch.
And we continue on.
And you'll see that the coil is actually on the right side of our work, which is on the
back.
We only see the purl side when we're working on this, we don't actually see it in front,
that coil actually happens in the back of what we're working on.
So, let's do it again without those written instructions getting in the way.
So, instead of just knitting a regular knit stitch, we first stop and we move our needles
so we have a lot of space and hold them sort of in this X shape right here.
And then we are taking that working yarn and we're wrapping it around counter clockwise
from the back to the front TEN revolutions TEN times around.
Then we're taking that yarn and we're going to wrap it around our back needle, just as
if we had if we were just going to regularly knit and we're going to knit it through that
stitch on the left, which is in green, and while I'm holding onto my yarn I make sure
that I, I wish I could show you what it looks like on the inside, I'm able to capture it,
get right under there, and here's sort of how it's looking on the inside a little bit
if that helps.
And we take the whole shebang, we take all of it off of the left needle and then we unwrap
that yarn so that it's nice and long and loose.
And then we pull on the yarn with our right hand and it makes this perfect coil.
It's really fun to do and I will tell you you definitely are going to make mistakes
along the way, so just have fun, have patience with yourself while you're doing it.
And here we're just finishing up with our knit stitch.
Again, the coil is on the back there, it's so cute, you can see really close up what
it looks like right there and if you would like to do a knit stitch pattern with the
Spring Stitch, I'm going to quickly demonstrate exactly what that stitch pattern is.
It is casting on in multiples of 4, so we have our beloved little slip knot and we cast
on four stitches, and then four stitches again, and four stitches again until you have the
number of stitches that you would like to have on your needle in multiples of four.
You'll see in the pattern we start with three rows of stockinette, that's knitting all,
purling all, and knitting all and we do that because our coils sort of loop down and you
want to make sure that your knit stitch pattern has enough space there so that the coils can
rest along your knitted piece.
And beginning here with the actual stitch pattern, we are purling one, and then we go
straight in to our Spring Stitch.
So, we're going to do it again.
We are going to place our needle as if to knit right there below, and now we take our
working yarn on our right hand and we coil it around counter clockwise ten times.
And we're going around both of those knitting needles.
And then we wrap it around that back needle and we are going to knit it, we're going to
hold our right needle and really slide it along the left, holding our yarn with our
right hand until it catches and we're able to knit it through that one stitch on the
left which right here you can see it in pink and we're taking everything off and now it's
time to unravel everything and sometimes it does get a little bit caught, you might want
to take your time to make sure that you have a really nice loose coil and then it's time
to pull into a perfectly shaped little coil.
Again, your yarn can catch, so just have a little bit of patience with it and when you
do your finished coil you can have it be a little bit loose, you don't want it to be
too tight.
And then the next stitch is doing one knit stitch and two purl stitches and you just
continue the knitting and the purling and the spring stitch according to the pattern
and here's what our little coil looks like.
Again, it's on the back of our work and when we flip it around this is what it looks like.
It's so pretty.
Row two is simply knititng all the way down row two.
Now, if you'd like to change yarn color, after row two, and after row four is what I think
the best time to change your yarn color.
Of course, get super creative and do whatever you'd like as far as colors but I think that
it looks best if you change it up after row two and after row four.
And that's what I'm doing here with row three, I'm going to change my yarn after row two
and row three with my white yarn I am going to be purling three purl stitches.
I have a lot of different yarn colors going on right now.
And after you do your three purl stitches, then you go straight into your spring stitch.
And the right hand yarn is going to go counter clockwise, so around to the front, around
and around for ten entire revolutions.
And once our yarn has gone around ten times we are going to take around that back needle
and we're going to knit it.
And we are going to then remove everything off onto the right needle and you know the
drill.
What are we going to do?
We are going to just loosely unravel our yarn all the way down our yarn tail here on the
right and sort of straighten everything out, make sure that there's no weird kinks or knots
and once we have it looking sprirally, then it's time to go ahead and just pull on the
yarn tail.
And the next stitch is going to be one knit stitch and we finish up this row with purling
two more stitches and just continue along with the pattern.
This is what it's looking like after row three of the pattern and then we're just finishing
up here on row four knitting all the way down the row.
And just follow these four stitches until your piece is the length you desire.
I hope you are inspired to knit up this spring knit stitch pattern.
It's definitely a fun one.
Make sure to check out my other knit stitch patterns.
Last week's Bubble stitch was a big hit, a really fun one as well.
I have lots of patterns linked down in the description below, make sure to subscribe
and I'll see you next time, guys.
Bye!
 For more infomation >> Grand Theft Auto V • Fun Stream - Duration: 51:03.
  For more infomation >> 《Wanna One》(繁中字幕)三分鐘男友賴冠霖(漂亮的男友)完整版 Lai Kuanlin SNL Korea 9 3mins Boyfriend 워너원 3분 남자친구 - Duration: 1:46.
  For more infomation >> 【Shadowverse】牌組介紹:法師-生物法師(WLD版) - Duration: 18:59.

 For more infomation >> El gran enfado de George Clooney por la publicación de fotos de sus hijos |GENTE DE FAMOSOS - Duration: 2:02.
  For more infomation >> Michael Douglas, bientôt grand-père : son fils Cameron, sorti de prison il y a un an - Duration: 1:42.
  For more infomation >> 차오루 생활고 고백, 시청자들은 공감했을까 - Duration: 3:41.
  For more infomation >> Julie Gayet et François Hollande : Heureux en vacances, ils posent enfin ensemble - Duration: 1:51.
  For more infomation >> 土砂流入の中央道通行止め続く 復旧の見通し立たず - Duration: 1:25.
  For more infomation >> Élaboration d'un tirage charbon sur plaque alu - Duration: 9:58.
  For more infomation >> Le grand Monarque serait - il née dans le courant des années 60 - 70 ou 80 ? - Duration: 8:12.
  For more infomation >> Protesters Gather Near State House To Oppose 'Free Speech Rally' - Duration: 2:50.
 For more infomation >> Une ancienne recette russe : efficace pour éliminer les poils du visage et du corps ! - Duration: 4:37.
 For more infomation >> Hassan Nasrallah, discours à la commémoration de la victoire de 2006 contre israel. Le 06.08.17 - Duration: 8:09.
  For more infomation >> Roman Polanski accusé de viol, le juge refuse de clôturer le dossier - Duration: 3:01.
  For more infomation >> INDIAN TELEVISION ACTRESS | HOTTEST AND BEAUTIFUL| TOP | HD - Duration: 4:29.
No comments:
Post a Comment