Liquid clay
Crimson dry pastel and some oil pastel
Bake the product in the oven at (110°C - 130°C) for 10-15 minutes
-------------------------------------------
#Des livres classiques ? 📚 - Duration: 14:17. For more infomation >> #Des livres classiques ? 📚 - Duration: 14:17.
 -------------------------------------------
【開箱#28】SEVENTEEN 4th MINI ALBUM《Al1》開箱! |s.coups !!|男飯開箱|CHAEHOYO - Duration: 3:33. For more infomation >> 【開箱#28】SEVENTEEN 4th MINI ALBUM《Al1》開箱! |s.coups !!|男飯開箱|CHAEHOYO - Duration: 3:33.
 -------------------------------------------
Mother Of Home Invasion Murder Victim Got To Say She Loved Him - Duration: 2:17.
IN EUROPE, 20,000 PEOPLE WERE
IN ATTENDANCE.
FOR NOW, NO GROUP HAS CLAIMED
RESPONSIBILITY.> WE HAVE
UNCOVERED NEW DEVELOPMENTS IN A
DEADLY CRIME SPREE APPARENTLY
CARRIED OUT BY 2 TEENAGERS.
WE HAVE BEEN TRYING TO FIGURE
OUT IF CRIMES ARE CONNECTED
BETWEEN THE SHOOTING OF THE DOG
IN THE FACE AND THE DEATH OF A
MAN ON SPRUCE STREET.
DAN HAS LEARNED A LITTLE BIT
MORE ABOUT THE MAN WHO DIED.
Reporter: THE VICTIM WAS 27
AND UNARMED.
THIS NEIGHBORHOOD USED TO BE
SEEN AS SAFE BUT NOW THE POLICE
ARE LOOKING FOR A SUSPECT.
CHRISTINE SPOKE TO HER SON,
TIMOTHY ANDERSON, JUST HOURS
BEFORE THE SHOOTING.
I TOLD HIM I LOVED HIM AND
HE TOLD ME HE LOVED ME.
WE SAID WE WOULD SEE HIM IN THE
MORNING.
THAT WAS THE END.
Reporter: HER SON WAS LIVING
WITH HER.
SHE SAID THE SUSPECTS, DMARCO
BLAKE, 17, AND ZJIAJNNI LACOUR,
15, BROKE IN AND STROLLED
VALUABLES.
SHE SAYS HER SON DIED DEFENDING
THE FAMILY HOME.
I THOUGHT THIS WAS A SAFE
NEIGHBORHOOD.
NOW I FIND OUT I WAS WRONG.
Reporter: ON SATURDAY DENVER
POLICE SAY THE 15-YEAR-OLD
TURNED HERSELF IN BUT THAT
BLAKE IS STILL ON THE RUN.
WHY DID YOU SHOOT MY SON?
WHY DO YOU THINK THAT IS OKAY
TO DO?
TO TAKE A LIFE? Reporter: SHE
SAID ANDERSON WAS A GENTLE ART
STUDENT WHO HAD TAKEN TIME OFF
SCHOOL TO HELP THE FAMILY. IT
JUST DOESN'T MAKE SENSE.
IF HE DOESN'T GET THE DEATH
PENALTY, I WANT HIM IN PRISON
FOR THE REST OF HIS LIFE.
Reporter: LAST WEEK DENVER
POLICE WOULD NOT CHARACTERIZE
THE MURDER AS PART OF A HOME
-------------------------------------------
【中字】柾國的大力秀~(It's Jungkook's show time~) - Duration: 0:44. For more infomation >> 【中字】柾國的大力秀~(It's Jungkook's show time~) - Duration: 0:44.
 -------------------------------------------
ENTREVERDES - CAMPINAS - Duration: 1:30. For more infomation >> ENTREVERDES - CAMPINAS - Duration: 1:30.
 -------------------------------------------
10 príbehov, ktoré menia Slovensko: Jakub Ptačin - Duration: 10:48. For more infomation >> 10 príbehov, ktoré menia Slovensko: Jakub Ptačin - Duration: 10:48.
 -------------------------------------------
TamTam, a Filipino in Paris-Tronche de Vie Documentary - Duration: 5:24.
I am TamTam, I live in Paris
I am a Filipino, Hello to everybody
You have a lot of things to miss in the Philippines
Specialy first your family of course
But you have to be breve, you have to be ready on that
We have 9…
5 sisters and I have 4 brothers
So it's a big family, Happy big family
I decided to move in Saudi Arabia
after the accident happened to my parent,
So after a year
I decided to move to Saudi Arabia because of My parents, they are gone already
so I decided to go abroad
During my first day in Saudi Arabia,
my first week in Saudi Arabia you know
I'm just washing my socks,
I cried, I cried promise
So I work from there for almost 8 years,
in Saudi Arabia as an accountant
That's why I decided to apply
for something for a new A new journey in my life
It's my dream country here,
First day in Paris, I embrassed the Eiffel Tower,
I go to the roots of the tower
I embrassed the Eiffel Tower, promise
So I told you, I'm your friend but, I'm still here
I'm still your friend but I don't want to be involve in your personal life problem
My visa here is a tourist, so it's expired already
To get the permanent visa or residence visa here in Paris
I think now the rules is 5 years
If you destiny is here, if your destiny is to get that paper
And if your destiny is in the Philippines, you can go back
When I arrived here, I stay at the hotel
for 6 hours only, I didn't sleep yet because
I searched on my social media account to search Filipino here In Paris,
so I'm so lucky because that time, before the end of the day
I got my friend, she is also a Filipina,
She helped me to stay in her house I get my laugage, back from Hotel
I have been here for 3 months exactly,
And I m really glad because only after a week
I got a work,
If you are good maybe you can receive good things from your life
I have 5 jobs in Paris, you know I have, housekeeping,
Im taking care of the kids,
from school, for bath, for food
And also, I have also caregiver here for the old men or woman,
You can do whatever you want,
you can do your job, Unlimited job, as long as you want.
I'm so excited everyday to wake up,
Just to see new things in my life
I send money monthly to my family
I have a big dream for my family, not just only for me
But for my family also and for my niece
Every month I buy at least 2 items, 1 items or 3 items,
Then I you saved that one after 12 months,
then you will send that one To the Philippines, specially during Christmas and new years,
So it's a very special for them
That's why I want to go,
move and move from my past
I'm just searching myself here in Paris
Because I don't know where my place is But I wish
Again this is a church
Ahh, this is the Notredames
I have faith in god,
he give me a lot, he give me strength
He gives me a lot of this, What i have in life
He can help my family
Welcome to Notredames
I always say thank you,
Thank you for this day, thank you for this wonderful life Even if it's too hard, it's wonderful,
Because I m still here, I m still alive
I think I m so lucky, I m the one lucky where I am now.
-------------------------------------------
How to Model (Sculpt) a Polar Bear in Clay - Narrated - Duration: 6:03.
Hello my friends and welcome to another Tuesday of tutorial!
I am Leonardo Pereznieto and today we will model a polar bear in clay.
These are the tools that we will be using.
And this piece of clay.
Which we cut, making a short rectangle.
The sculpture will not be in full detail, it will be
like a sketch in clay.
Then we wrap it, forming a sort of cylinder.
And we add another lump for the head.
Our bear will be sitting, so let´s add some clay for the hind
legs on the sides.
And we start carving out the shape, taking some clay from the top…
and from the face.
We roughly shape the snout.
I use a lot both, my fingers
and the tools.
I will take off some of clay from the head and from the neck.
All right!
Although our bear, I think is looking more like a seal right now [laughter].
But we will remedy that.
Yes, definitely the neck is too thin.
We add some clay on the back for the shoulder blades,
they pop up because there is a lot of weight, supported
by the front legs.
We make a line... the back leg is only arriving to this point.
And we build it front one by adding clay, and then rounding it a bit.
We form the first paw and let´s model the legs on the other side.
Like this.
The back one goes here.
It´s pretty rounded when it is on this position.
And the upper part sticks out to the side.
And the front leg.
Right here.
The part of the chest between the two front legs, goes in.
It is a slight recess.
On the upper part there is --ah-- fluffy skin [laughter].
To sculpt this, I have several reference photos, and even a polar
bear video that I´m watching because unlike in a drawing or painting
where you can solve it with one picture, here you are modeling from every
angle, 360 around and even from the top and underneath. So you need
a lot of references, or at least I do!
Maybe artists that are more familiar with this beautiful animals
don´t need as me.
The snout is a bit like a tube or rectangle, and then the head is wider.
We do the eyes here, and the ears.
Which are short and rounded.
As I mentioned in my recent tutorial about how to draw a polar bear
made of ice, because of expected habitat loss, caused by climate change
the polar bear is classified as a vulnerable species
their habitat which is the sea ice
the frozen sea
it´s shrinking every year.
We need to take care of this!
Behind the eyes there is a bone that protutes a little bit, we add this.
Let´s also add the other one over here.
And we add a little bit here... and then smudge it.
The mouth…
this metal tool is actually a Dentist tool [laughter].
While this wooden one, with a wire… that is for sculpting
and modeling.
The list of materials is in the description under the video.
Here are the paws.
They are pretty thick.
And fluffy [laughter].
At least they look fluffy I am sure, they are so strong.
I invite you to subscribe to my long tutorials on my Patreon account.
Ok, we are done with the bear I´ll take it off to make the base.
Oops I almost destroyed it!
But he is ok don´t worry.
I´m making a flat iceberg which will be the base for the bear.
The idea is as if he were floating on this little iceberg.
As you see I also use a painting spatula to do straight cuts.
Large or also can be small, like the texture on the ice.
And this wooden knife which is my favorite tool!
And the one I use the most.
Since it is harder to model the bear with the head turning, I modeled it straight,
and now we can turn it.
¡Excelente!
I love modeling!
The last touches and it´s ready!
If you enjoyed it please give it a LIKE! share it to your friends and subscribe
to Fine Art-Tips and to Patreon.
You know where to follow me, the links are below.
And I will see you on Tuesday :)
Subtitled by Grethel Trejo
-------------------------------------------
Nouvelles de l'Équipe de la Défense - le 23 mai 2017 - Duration: 4:23. For more infomation >> Nouvelles de l'Équipe de la Défense - le 23 mai 2017 - Duration: 4:23.
 -------------------------------------------
Hunter x Hunter - Departure (Opening) Guitar Tutorial | Guitar Lesson + TABS - Duration: 4:03.
Thank you for watching my Hunter x Hunter - Departure (Opening) Guitar Tutorial.
You can download Hunter x Hunter Tabs from my site, link in the description
If you want to see more Hunter x Hunter Guitar Lessons and other Anime Guitar Lessons, feel free to subscribe!
I hope you like my Hunter x Hunter - Departure (Opening) Tabs.
Any way I could improve this Hunter x Hunter - Departure (Opening) Guitar Lesson? Let me know in the comments.
Remember to ask the tab author for permission first before making an Hunter x Hunter Guitar Cover
-------------------------------------------
Une Sombre affaire de Drogue sur Youtube - L'Hebdo #95 - Duration: 12:50. For more infomation >> Une Sombre affaire de Drogue sur Youtube - L'Hebdo #95 - Duration: 12:50.
 -------------------------------------------
Versance on the floor - Bruno Mars Cover by ไปน์ - Duration: 1:33.
Let's take our time to night,Girl.
Above of all the star are watchin'
There's no place i'd rather be in this world.
Your eyes are where i'm lost in
Underneth the chanderlier.We're dancin' all alone
There's no reason to hide what we feelin' inside right now
So baby let's just turn down the light and close the door
Ooh,I love that dress but you don't need it anymore
No you don't need it nomore
Let's just kiss till' naked,baby
Versance on the floor
Ooh,take it off for me,for me,for me,now girl
Versance on the floor
Ooh,take it off for me,for me,for me,now girl
-------------------------------------------
Syrniki baked in the oven (cheese cupcakes)! - Duration: 1:55.
Hello and Welcome to our channel!
Today I'll show new way of cooking traditional Russian Syrniki
We will bake them!
We will need:
400 g or 14 ounces cottage cheese
1 Tablespoon all-purpose flour
1 large egg
1 Tablespoon sugar
2 Tablespoons raisins
Vanilla sugar to taste
and 1 banana
Let's get started!!!
Preheat oven up to 180°C or 356°F
In a large bowl whisk egg with sugar and vanilla until white and smooth
Then add cottage cheese and mash banana with fork
Subscribe! And you never miss our new video-recipes
Put raisins, flour and thoroughly mix
Let batter to rest for 10-15 minutes at the room temperature
After the rest mix batter again and put into small silicone muffin cups
More delicious recipes on out website rednumberone.com
Place cups on the oven tray and bake syrniki in the oven 20-30 minutes until evenly golden
When syrniki are ready, take them out from silicone cups while they warm
Serve syrniki with sour cream, yogurt, jam, honey, powdered sugar or fresh berries
Bon appétit!!!
Thanks for your watching!
If you enjoy this recipe, please like it and subscribe!
-------------------------------------------
Jeep Wrangler Rugged Ridge 3/4" D-Shackles (87-17 YJ, TJ, JK) Review & Install - Duration: 4:46.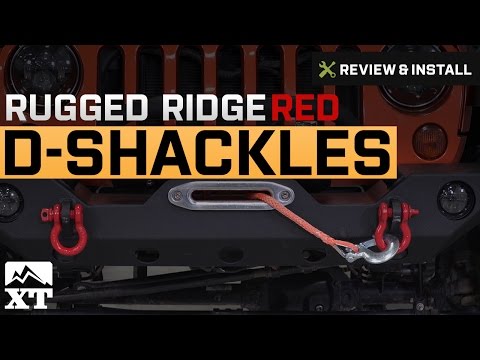
I'm Ryan from extremeterrain.com, and this is my review of the Rugged Ridge 3/4 inch
D-Shackles, fitting all 1987 and up Wranglers.
These are available in the red color that you see here, they're also available in black
or in a silver with a red pin.
So you can get whatever ones look best with your build.
Today we're gonna talk through how to use a D-Shackle like this, what they're used for,
and how to use them safely, as well as some of the features and the construction of these
ones in particular.
For those of you who go off-road, a D-Shackle like this is going to be useful in recovery
situations.
Whether you're using a self-recovery winch attached to a tree or to another Jeep, or
you might even be using a snatch strap or a tow strap for your recovery, attaching those
straps or winch lines with a D-ring is a very secure and easy way to do so.
Some people do use tow hooks and you can certainly do that, but especially with something like
a snatch strap that's designed to have a little bit of slack in it and then be pulled taut,
having a D-ring ensures that the loop of the strap is going to stay exactly where you put
it until you want to remove it, which is why I really like using D-rings on a specific
shackle mount versus a hook in most situations.
Now those of you who don't go off-road might still have an off-road style bumper with some
shackle mounts on it, and those mounts might look a little bit funny without the actual
D-rings in them, so these can be picked up for just a few dollars and added to your Jeep
as well to give you a little bit more of that off-road look.
And that's why these come in a few different colors, not because one works better than
the other, obviously, but because a lotta people are just running these for the looks.
As it says in the title, this is a three-quarter inch shackle, and it has a 9,500 pound working
load limit.
And three-quarter inch is a pretty standard size.
You can always take a measurement of the hole that you have in the shackle mount on your
bumper to ensure that these are going to fit, but again, three-quarter is going to work
for the vast majority of the bumpers and the mounts that are out there, you can certainly
get some larger ones that are 12,000 pounds or even more of a working load limit, but
for most of us, these are gonna work just fine.
Now you have to figure that if you are stuck up to the axles in mud, you have another Jeep
using a snatch strap for recovery, you are gonna have some pretty serious stress on the
shackles.
So don't skimp on these.
Make sure you're gonna get one that is going to be able hold up to the weight of your Jeep
as well as any additional weight from whatever situation you're in when you're stuck.
Of course there isn't much of an installation for a D-Shackle like this, a lot of us will
just leave them attached to the bumper all the time, either because we like the look
or because it's just convenient to have them there.
Others don't like to leave them on the bumper because they can rattle a little bit, they
might be worried bout them vibrating loose or somebody taking them off your Jeep in a
parking lot.
So some of us will just keep them in our recovery bag.
Either way, these are going to be something that's very easy to attach and unattach from
your Jeep, they have a threaded pin on the one end, you can remove, go through your tow
strap or your winch line and right on to your D-ring mount on your front or your rear bumper.
You can attach a couple of these together, you can really have a lot of flexibility with
how these are gonna get used.
This is also something you'll use to attach your tree saver to a tree or to a snatch block,
again, these have a lot of uses in a recovery situation and you really can't have too many
of these in your recover bag.
These D-Shackles come in at right around $26 for the pair, which is really the going rate.
Of course the ones that have a higher pulling capacity or that are made of stainless steel
for instance, are going to be more expensive, but this is more or less the going rate for
a pair of 9,500 lb. three-quarter inch shackles.
Now whether you want the black, the red, or the silver with the red pins, they're gonna
be right around the same price, but do consider that if you're getting the powder-coated version
because you like the look of them but you also plan on using them off-road, there's
always a chance that a winch line or a snatch strap line is going to rub a little bit of
that powder coat off.
So if you're looking for some D-Shackles to add on to your bumper to make it look complete
or because you just need a couple extras to throw in your recovery bag for the next time
you're stuck off-road, I think this is going to be an affordable and quality option.
So that's my review of the Rugged Ridge 3/4 inch D-Shackle, fitting all 1987 and up Wrangler,
that you can find right here at extremeterrain.com.
-------------------------------------------
Le sirop d'érable de Saint-Robert-Bellarmin | ON EST LES MEILLEURS - Duration: 3:01. For more infomation >> Le sirop d'érable de Saint-Robert-Bellarmin | ON EST LES MEILLEURS - Duration: 3:01.
 -------------------------------------------
(Duyuru) D: - Duration: 0:48. For more infomation >> (Duyuru) D: - Duration: 0:48.
 -------------------------------------------
Here's My Canada: We Can Play With Friends - Duration: 0:13.
I like my freedom to go to school,
and to play with my friends.
-------------------------------------------
How the Post Office Made America - Duration: 10:57.
This Wendover Productions video was made possible by Away.
Get $20 off the perfect suitcase from Away with the code "Wendover" at checkout.
The Post Office Made America.
It's an ambitious claim, I know, but without it the United States as we know it today would
not exist.
As author Winifred Gallagher eloquently pointed out in her book, "How the Post Office Created
America," in the years following the American Revolution, one didn't say, "the United
States is," they said, "the United States are."
The country at the time was just a lose collectivity of states.
The national government was weak—people identified with their state first and their
country second.
With the opening of the post office, however, Americans across the continent had for the
first time a direct link to the federal government and the outside world.
In the New England colonies that preceded the United States, infrastructure was poor.
It was considered a great achievement when travelers could finally reach New York from
Boston in under a week.
There was little emphasis on creating roads between colonies since each was a unique,
independent entity.
Some have even attributed the colonist's lack of attachment to the crown to their lack
of roads.
Those living outside of cities might have never met a royal official in their lives
just because of how hard it was to get around.
Given this, the crown's postal service in the colonies was slow, expensive, and emphasized
links across the Atlantic to Britain almost more than it did links between the colonies.
Before the American Revolution there were unofficial, almost black market ways of getting
mail around, but the increasingly legitimate continental congress—the group that eventually
declared American independence—realized that in order to properly coordinate and collaborate,
the member colonies needed a way to effectively communicate.
Therefore, surprisingly, the United States Post Office was founded almost a full year
before the United States itself.
In the century following its founding, the US had a bit of a good problem—it expanded
in territory faster than it could expand in people.
For much of its history and still to an extent today, the United States was a country of
vast, untamed wilderness.
This was especially true in the early years to the west of the Appalachians.
Despite the gold rush, California only hit a population of 1 million in about 1890.
By that time the nation had a population of over 60 million.
And between California and the Appalachians during the early 1800s there was hardly anything—
especially roads.
California might as well have been an island.
To get there, most people and mail would take a steamship down to Panama, cross the country
on land, and then reboard a ship to California rather than attempting to cross the continent
by land.
People were naturally afraid to settle the frontier.
The idea of being physically and informationally detached from the civilized world while surrounded
by untamed and dangerous wilderness made it difficult for the new nation to push west.
You have to remember that until the telegraph became widespread in the 1850s and 60s, mail
was quite literally the only way to communicate long-distance.
If you had a post office, you were connected, if you didn't, you were alone.
Therefore, one of the first steps for a new town to legitimize itself was to appeal to
the federal government for a post office, and this was usually granted.
Having a physical vestige of the federal government in towns across the continent was immensely
beneficial.
Many would even say it played a large role in America's success.
You see the US today as a fiercely nationalistic country, but, as mentioned, for a while state
came before country, however, these new brick and mortar representations of the power and
benefit of the federal government helped tie the nation together, but the post office's
impact didn't stop at its mere existence.
Newspapers shipped free—or at least close to free—and that revolutionized the spread
of information.
In the 1850s, this meant that someone in brand new Houston, Texas could read a newspaper
just as easily as someone in Washington, DC.
If it had been more difficult to distribute national newspapers, individuals wouldn't
have had information on national politics.
Without knowledge of national politics, the state might have stayed as the dominant entity.
The long overland routes to tiny frontier towns absolutely did not make money, but the
post office wasn't supposed to make money at the time.
It was there to make living in a frontier town of 1,000 as similar as possible to living
in an east coast town of 100,000.
150 years ago, it took more than a month and a half to travel to many parts of the frontier
from New York… if you could get to them at all, however, the post office needed faster
routes so it created post roads—long rudimentary overland routes.
With time and traffic, however, these post roads developed into America's first interstate
roads.
The informational links led to a physical links.
A big question, however, was how to efficiently get the mail out into and across the frontier.
In 1860, the railroad ended in western Missouri and after that the mail had to go out over
land.
The Pony Express was a short lived commercial express mail service connecting the end of
the railroad to California.
In only 10 days, it could get a letter from the Atlantic to the Pacific.
This was unbelievable at the time.
Once mail arrived at the end of the railroad line in St Joseph's, Missouri, a rider would
take the pouch of a mail and immediately start riding west at up to 25 miles per hour—full
speed—and then every 10 or so miles they'd stop at a Pony express station to switch to
a fresh horse.
Every 75 miles, they'd switch riders to keep the mail pouch thundering across the
country day and night.
This didn't come cheap—it was the equivalent of $130 to send just one half ounce letter—but
time is money and people did pay.
One of the most famous rides of the shortlived Pony Express was following the 1860 presidential
election.
Telegraph did exist at the time but it didn't stretch all the way across the country.
The eastern line ended in Fort Kearny, Nebraska, so immediately following the news of Lincoln's
win, a rider set out west.
Using the relay system, riders made their way across the country to Fort Churchill,
Nevada—the beginning of the western telegraph line—to transmit the news.
The west coast papers therefore published the news of Lincoln's win only seven days
and 17 hours behind the east coast papers.
Just two years earlier, it took 17 days for news to cross the continent.
This was an unbelievable feat.
With the completion of the transcontinental telegraph line in 1861, however, the Pony
Express closed its doors after only 19 months of operation, but it did play a big role in
the innovation of mail systems.
As mail volume rose to the west coast, the US Post Office looked for ways to further
shorten the travel time across the continent.
Until the opening of the transcontinental railroad in 1863, most transcontinental mail
went out to Missouri by rail before switching to lower cost stagecoach rather than the Pony
Express.
At first all westward mail was put on the train to be sorted in Missouri, but in 1862
the first post office on wheels was put into operation.
A staffer would sort the mail while on the move in an identical way as a post office
on land so when it arrived in St Joseph's, Missouri, it was all split up into different
bundles for different destinations.
This system proved incredibly successful and in the coming decades, the post office gave
exorbitant subsidies and payments to railroads across the country to move mail.
Most lines to small communities would never have been financially viable without the post
office contracts they attracted.
The Post Office, therefore, was instrumental in physically connecting small towns across
America to the outside world.
Expansion was getting easy.
This role in innovation happened once again in in the 1920's.
Aviation became big during World War One, but once peace was settled it almost became
irrelevant.
Civil aviation was at first nearly nonexistent.
Just months after the end of World War One, however, the first regularly scheduled airmail
route between DC and New York began.
By 1925, airmail routes stretched to hundreds of towns all across the United States.
Just like with the railroad, the post's subsidies allowed for air service to towns
that would never have been profitable with passenger only flights.
The US air mail service grew to become the largest in the world making the US one of
the most connected countries in the world and its legacy still survives today.
Many of the airlines that merged into United, Delta, and American Airlines were founded
as airmail operators.
It's easy to forget that 200 years ago only 8 million people lived in the 20 states and
four territories that formed the Union.
The continent filled in incredibly fast and a lot of credit has to be given to the postal
system.
Few countries as large as the US have such a strong national identity.
The spread of information is one of the greatest determinants of a country's success and
its unlikely the US would be such a global superpower today without the education, connectivity,
and innovation that the post office bought.
Of the five largest countries in the world, the US is the only to not have a serious present-day
sovereignty movement within its borders.
The has to be at least partially attributed to how easy it has always been to spread information
across the country.
It may be obsolete today, but the post office was once the peak of innovation—so much
so that it made America.
This video was made possible by Away.
This past weekend I travelled transatlantic with my new Away suitcase and I can now honestly
say it's the perfect suitcase.
It's just wonderfully designed.
It looks great and has a built-in TSA approved lock on the top.
Inside, you put bulky stuff on the left held in by the mesh and clothes on the right to
be compressed by the straps.
It has a spot for a laptop and even a waterproof laundry bag to fill up as you go.
By far the best feature, though, has to be the built-in battery to charge your phone,
tablet, or anything else powered by USB.
It can charge your iPhone up to five times so that you know that you'll always have
a charge when you're on the go.
You can get your Away suitcase with $20 off and free shipping within the contiguous United
States by going to awaytravel.com/Wendover and using the code "Wendover" at checkout.
It's a great way to both support Wendover Productions and get, as they say, "first
class luggage at a coach price."
If you haven't already, please check out my new podcast called Showmakers linked here,
check out my last video, and subscribe to this channel.
Thanks for watching and I'll see you again in two weeks for another Wendover Productions
video.
-------------------------------------------
Here's My Canada: We Respect Others - Duration: 0:12.
Being Canadian means respecting other
people, we help people and kids on the
street, and give them food and clothes.
-------------------------------------------
Here's My Canada: We Help People - Duration: 0:06.
Being Canadian means helping people who
don't have homes.
-------------------------------------------
Here's My Canada: We Don't Allow Bullying - Duration: 0:14.
Canada is a place that does not allow
bullying, and that is that's why I love
living here.
-------------------------------------------
Here's My Canada: We Can Make New Friends - Duration: 0:14.
I like Canada, because it is a great
country to live in. There are many
nice people and you can be friends with
who you want. Be safe!
-------------------------------------------
Zona de Desenvolvimento Proximal - Duration: 1:50. For more infomation >> Zona de Desenvolvimento Proximal - Duration: 1:50.
 -------------------------------------------
Relaxation ultra profonde et sensations subtiles - Duration: 1:02:22.
Ultra deep relaxation and subtle sensations
The power of relaxing music helps getting into relaxation faster.
New Age music that creates an atmosphere conducive to relaxation.
Feeling of psychic appeasement.
Better management of emotions.
For maximum efficiency, headphones is preferable.
Music to calm down.
Soft and soothing music.
Very fast soothing effect.
Conscious relaxation.
Applied daily, relaxation has several virtues:
it reduces stress, helps to manage it better,
prevents respiratory problems,
reduces the frequency of asthma attacks,
improves sleep quality, and even self-esteem.
And even listening to his body, one generally feels better about himself ...
For your hypnosis sessions, relaxing musics, meditation, well-being, binaural sounds, isochronous sounds, please subscribe to this channel. Thanks
-------------------------------------------
How does money laundering work? - Delena D. Spann - Duration: 4:47.
As one of the most notorious gangsters in history,
Al Capone presided over a vast and profitable empire of organized crime.
When he was finally put on trial,
the most he could be convicted of was tax evasion.
The nearly $100 million a year,
that's 1.4 billion in today's currency,
that Capone had earned from illegal gambling,
bootlegging,
brothels,
and extortion,
would have served as evidence of his crimes.
But the money was nowhere to be found.
Capone and his associates had hidden it through investments in various businesses
whose ultimate ownership couldn't be proven,
like cash-only laundromats.
In fact, those laundromats are part of the reason for the name of this activity,
money laundering.
Money laundering came to be the term for any process
that cleans illegally obtained funds of their dirty criminal origins,
allowing them to be used within the legal economy.
But Capone wasn't the first to launder money.
In fact, this practice is about as old as money itself.
Merchants hid their riches from tax collecters,
and pirates sought to sell their bounty without drawing attention
to how they got it.
With the recent arrival of virtual currencies,
offshore banking,
the darknet,
and global markets,
schemes have become much more complex.
Although modern money laundering methods vary greatly,
most share three basic steps:
placement,
layering,
and integration.
Placement is where illegally obtained money is converted into assets
that seem legitimate.
That's often done by depositing funds into a bank account
registered to an anonymous corporation or a professional middleman.
This step is where criminals are often most vulnerable to detection
since they introduce massive wealth into the financial system
seemingly out of nowhere.
The second step, layering, involves using multiple transactions
to further distance the funds from their origin.
This can take the form of transfers between multiple accounts,
or the purchase of tradable property,
like expensive cars,
artwork,
and real estate.
Casinos, where large sums of money change hands every second,
are also popular venues for layering.
A money launderer may have their gambling balance made available
at a casino chain's locations in other countries,
or work with employees to rig games.
The last step, integration, allows clean money to re-enter the mainstream economy
and to benefit the original criminal.
They might invest it into a legal business
claiming payment by producing fake invoices,
or even start a bogus charity,
placing themselves on the board of directors
with an exorbitant salary.
Money laundering itself
wasn't officially recognized as a federal crime in the United States until 1986.
Before that point, the government needed to prosecute a related crime,
like tax evasion.
>From 1986 on, they could confiscate wealth simply by demonstrating
that concealment had occurred,
which had a positive effect on prosecuting major criminal operations,
like drug traffickers.
However, a legal shift has raised concerns
involving privacy and government surveillance.
Today, the United Nations,
national governments,
and various nonprofits
fight against money laundering,
yet the practice continues to play a major role in global crime.
And the most high-profile instances of money laundering
have involved not just private individuals,
but major financial institutions and government officials.
No one knows for sure the total amount of money
that's laundered on a yearly basis,
but some organizations estimate it to be in the hundreds of billions of dollars.
-------------------------------------------
See the story of the American who managed to heal from stage 4 cancer - Duration: 4:37.
See American history that could heal from cancer at stage 4
Ann Cameron is an American writer, author of children's books, and she has an incredible
history.
She was able to cure cancer in stage more advanced, known as stage 4
just taking carrot juice.
The most surprising is that this story she achieved the feat without chemotherapy,
radiotherapy and no radical change in your diet.
On June 6, 2012, Ann had surgery to fight colon cancer in stage
3.
It took five months after the surgery to she finds out, through routine tests,
that her colon cancer had advanced for stage 4, with metastasis in the lungs.
The doctor predicted two to three years of life to Ann, because according to the expert,
radiation treatment would be futile for your case.
Still, chemotherapy was recommended, even knowing that it would not extend its
life.
Seven years ago, Ann's husband had died of lung cancer.
So you can imagine the despair that He led the writer to delve into an intense
research in search of an alternative cure.
His search finally ended when he found the story of a man named Ralph Cole.
He had been cured of cancer in the neck simply drinking 2.5 liters of juice
organic carrot daily.
Immediately, on November 17, 2012, Ann began his daily regimen of juice
carrots.
She beat the juice early in the morning.
I had a glass in the morning and the refrigerava rest to go consuming during the day.
Ann consumed 2.5 liters of carrot juice organic every day.
Ann continued eating meat and, although not recommend this food, took up ice cream.
On her website she emphasize that part to show that the only change she did,
He was drinking carrot juice.
In January 2013, after eight weeks of taking 2.5 liters of all organic carrot juice
day, Ann had wonderful news: CT showed that
tumors had stopped growing and swelling lymph nodes had decreased.
Two months after that Ann tomography found there was no longer swollen glands
and lymphatic tumors continued shrinking.
On July 30, 2013, eight months after the beginning of his lonely fight against cancer,
Ann received the most amazing of all news: She was cancer free!
How to explain these results?
Why organic carrot is so special about to cure cancer?
The answer may be "falcarinol" a antioxidant found in carrots and proved
have anti-cancer properties.
Researchers from the UK and Denmark They were able to use this antioxidant to
reduce cancerous tumors in mice successfully.
In addition, a study in humans found the carrot juice consumption increases
carotenoid levels in the blood of survivors of breast cancer.
Scientists believe that rising levels carotenoid acts as a prevention
against cancer.
Like the story of Ann?
She has a very cool site that all account their experiences during this period.
It is worth checking.
Remember that people who have problems with cancer can not ignore the medical treatment.
Ann did not fail to attend hospital and did not fail to make your follow-up examinations.
So it is important to always talk to the doctor about treatment options
available.
-------------------------------------------
Auld Lang Syne(蛍の光) with Lyrics(歌詞あり)Jingle Punks - Duration: 2:03. For more infomation >> Auld Lang Syne(蛍の光) with Lyrics(歌詞あり)Jingle Punks - Duration: 2:03.
 -------------------------------------------
3 Mistakes Conferences Make With Keynotes - Duration: 3:47.
- So let's talk about three mistakes
that conferences just keep making again
and again with their keynote speakers.
And I mention these to you
so that when you're in that position you'll say,
you know what, I don't think that's a good idea.
The first one is
the set up of the room and those
daggone round tables with chairs.
Oftentimes, they will put, the organizers,
the round tables in there, and they'll say,
okay, this works really really well.
Until people actually sit in them
and then all of a sudden
the chairs go out.
Everything gets tighter.
And then all of a sudden you notice that some people
are not facing the speaker.
If they're gonna see the speaker they have to
turn their necks, or they have to
lift their chairs up and face the stage.
You don't want that.
The ideal setting is theater style.
I'm telling ya, it makes a big big difference.
Second mistake that we oftentimes see
is not understanding what is called the sardine effect.
The importance of everybody feeling close,
tight, the proximity matters.
And so what this means is oftentimes
they'll put the keynote in a room that's too big.
And then it has the cavernous effect.
So in other words, where the end of the rows are
you don't want a huge amount of space to the walls.
You want it to be tighter.
Side walls, and back walls.
Also, you don't want to have extra chairs.
So make sure you have one chair per attendee.
And by bringing in the walls
and by making sure that it's one seat per attendee
you can experience what is called the sardine effect.
And it's more of a familial, a community event.
Finally, the third mistake
is planning back to back keynotes.
Not a good idea.
So what I mean by this, well let's say you have
one keynote, who's 45 minutes
and it's great, and everybody enjoys them.
And then all of a sudden, you've just got
another keynote that comes up.
It is hard for people to make that mental shift
from speaker to speaker without a break.
I know a lot of people don't want to
immediately follow me.
Because I have such a different style.
And I feel the same way about other people.
It's better to let the audience just sit on it
for a minute,
reconvene, recollect their thoughts
and then bring them back together.
And sometimes it's tough for the speaker, as well
to hurry up and get set up
and get everything straight in terms of the mic
and the slides and the this and the that.
Things just feel disorganized
at the beginning of the talk.
You don't want that.
So how do you prevent it?
You make sure when you see that initial agenda,
that initial schedule
if you're slammed up in the keynote hall
with another speaker then you make the suggestion
of a break.
I'm telling ya, it works.
So just to repeat the three, here we go.
Number one
round tables are bad.
Go with theater style seating.
Number two
focus on enabling the sardine effect.
Don't allow a huge space between
the rows and the walls
in the back room, and make sure you have
one seat per person.
And then finally, don't try to mash up
those keynotes together.
Separate them with a break.
And if you do that
now the audience can reconvene,
recollect and be ready to go
for the next keynote speaker.
And that will help your keynote speech
dramatically more effective.
-------------------------------------------
Vlog (English Subs) : Une vegan en Guyane #3 : Le marché de Montjoly - Duration: 7:57.
Hello my foodies!
Today you will see the 3rd episode of my trip in French Guiana.
If you want to know what we did, stay with us!
Manue : Hello! Lily : so we are on the third day of our trip in Guiana!
Lily : What do you think about it so far Emmanuelle?
Manue : There's a lot of rain! Lily : that's true!
Manue : so we can't do all the activities we planned, but don't worry, tomorrow we planned a day at the creek (a small bay, I am not sure for that translation)
Manue : I think Jo would keep a good memory of it!
Manue : right now, we are going to the Market where she will discover fruits from Guiana and how people behave in the market.
Lily : So they behave differently from other market? Is that it?
Manue : they are ethnic groups who are different from others.. Well I'm kidding but… generally speaking, there are different behaviours regarding communities.
Manue : we wanted to go to the beach this afternoon, but look! The weather is really bad…
Manue : So tonight we will play games with Pascou (Pascal) in the back…
Manue : Pascou! Won't you say hello? (this part will be hard to translate, I don't think it would have a meaning in English but well xD)
Manue : You're here… Sitting comfortably, you're an old man…
Manue : Anyway, now where going to the post office,
Manue : i am going to park here... so.. follow our adventures!!
Lily : Pascal, any last word?
Pascal : yeah, good adventures…
Lily : Emmanuelle, where is the post office?
Manue : first! Here we've got the city hall of Monjoly!
Manue : Behind us it's the church! I sometimes go there on Saturday! This is the big church of Montjoly
Manue : And the post office over there!
Lily : ok 'cauz I thought the post office was there! (in the church)
Lily : When I worked in Bray & Lu, the post office was inside the city hall!
Manue : Really?
Lily : yeah! And it was often closed!
Manue : oh… I see…
Lily : So I thought the post office was inside the church 'cause we parked there.
But no. The post office is just in front on us (the blue building with a yellow sign which is the logo of the French post office).
On our way to Montjoly market
Lily : so we are now… Manue : here is the market.
Montjoly Market
Lily : it smells good!
Manue : we will show you the market
Manue : these as the bananas you use when you want to fry it.
Lily : yeah! when you want your bananas to be really sweet!!
Manue : hot peppers! So hot peppers is called "bonda monjac"
Manue : there are a lot of different sorts, like the orange ones!
Lily : yeah, like in Cameroon…
Manue : here is couac (the thing in the plastic bag on the top, I did not film it well sorry) ! It's…
Manue : Pascou!
Pascal : hum? Manue : the couac..
Pascal : what? Manue : it's cassava right? Pascal : yeah!
Manue : so it's cassava's flour, you can eat it as a topping on red beans or lentils.
Lily : ok; i only know the name "manioc"
Lily : what is it? Manue : these...I don't know…
Manue : Pascou, what is it? I don't know that… Sorry, what is it? The man: it's pumpkin!
Manue & Lily : oh ok
Lily : this is Jerusalem artichoke!
Manue : Ananas Lily : cabbage!
Lily : pumpkin again….
Manue : we often use cabbage as a side dish when we cook chicken.
Manue : Here are bananas, the small one are called "bacove", you can eat it raw.
Manue : there are mangos, but we can have some at my grandpa's
Manue : then paripou! you see, it's 4 euros everywhere! they are from Iracoubo, a city of Guiana.
Lily : and these are...! Oh! Jackfruits!
Lily : I have never tasted it, I want to have some later…
Lily : bananas, again, corn...
Manue : Chorossi. It is…When can we eat chorossi….(at Pascal) When do you eat it?...
Manue : You can eat it like that or you can add it to dishes. Lily: can we eat it raw?
Manue : yeah, If you want. People can eat it raw, personally I don't eat a lot of chorossi.
Manue : To me, it's too bitter and sour, but it can be good if you put it in a dish.
Lily : what are these kind of cucumbers? Manue : I don't know these. It's the first time i see this.
Manue : we usually eat normal cucumbers. I have ever seen those..
Lily : ok Manue : yam!
Lily : i want to eat sweet potatoes..
Manue : Dachine! Lily : I don't know dachine! what is it?
Manue : it seems like yam and sweet potatoes Lily : oh ok Manue : you can eat it huum... It's really delicious!
Manue : it's really big. Most of the time, people eat that with fish
Manue : but you can eat it with yellow bananas (plantain) or yam.
Manue : it's a good... Lily : do you know how to cook it? Manue : hum?
Lily : do you know how to cook it? Manue : yes, i do!
Lily : you have to boil it, right? Manue : yes!
Manue : these are.... Lily : oh! peanuts!
Manue : hum? Lily : these are peanuts! Manue : yes!
Manue : here you have bottles of saté sauce Lily : oh! Manue : you can come here later to buy it!
Manue : please, have a look on the price of tomatoes...
Lily : 5 euros... (it's twice the price as in Paris)
Lily : ok Manue : 5 euros is ok, sometimes it's 8 euros/kg
Lily : ok... Manue : i think today's price is ok!
(The cover side of the market) Manue : all craftspersons are here...
Manue : you can buy tiponche if you want to (it's an alcohol) Lily : lol
We are talking about here glasses, it's not really interesting ^^'
Here is what we did the 3rd day of my arrival in French Guiana
If you enjoyed the video, please give a thumb's up!
If you did not see the first and the second part of the trip, i will put it in the description box or here (i was showing my right, i forgot i was filming ^^' )
or at the end of the video, i don't know yet (it's at the end of the video xD )
Anyway, don't worry you will be able to see it too.
I will upload the rest in 2 weeks if everything goes as i hope.
Waiting for that, eat a lot of vegetables, drink a lot of water,
but first and foremost, keep smiling :)
Deuces!
-------------------------------------------
How to Make Stock with a Vulcan K Series Commercial Kettle | For Soup, Stew, Chili, and Sauce - Duration: 3:32.
The steam jacketed kennel is ideal for
soups and stocks because it has low
temperature, easy control, heavy bar rim,
3/16 liner, emboss gallon markings, and
true working capacity. Steam jacketed
kettles are ideal for full many
restaurants, college and universities,
k-12 school food service, correctional
facilities, military and business and
industry. For those long cooking
operations such as soups, stews, and
sauces. Factory-based soup stocks and
bases do not come close to the flavor
that's in a homemade soup stock. The
perfect soup stock starts with fresh
vegetables and your meat products. We're
going to make a beef stock today. So the
first thing we're going to do is take
the beef bones, place the bones in the
center of the oven, set your timer for
one hour. To give that deep rich color
that you look for in a stock, you want
to paint the bones with the tomato sauce
or tomato paste. Take a little nip off
and just pour it on top this allows
these vegetables to sweat and become
full flavorful when they go into the
stock. Back into the oven for 15 minutes
and now I trim my vegetables. Save the
trimmings because this is what's going
to make your stock. Okay to make your
sachet d'Epices, you take a cheesecloth.
You take a few peppercorns, a couple fresh
bay leaves, some fresh thyme, garlic, and
parsley. You would take this nice little
package and wrap it up. Take your butcher
string. Put this into your stock
just before you start to cook it. Okay
the trimmings go into the pot. We take
our baked bones and put them in the pot.
The key to the perfect soup stock is
starting with cold water. You come on you
turn the kettle on. Add your previously
made sachet into your stock. Make sure
your temperature is in a simmer because
you don't want to boil your stock. We
have a stock that's been cooking all
night long. Now it's ready to be strained.
Get out your bag and you might want to
strain off any of the other impurities
that float to the surface. Now I'm
installing the pouring lip strainer. This
is going to allow me to easily strain
the kettle into the storage container.
Look at that deep rich color. The next
step in the perfect stock is the second
straining. You take a fine mesh strainer
and there you have it.
Ready for the refrigerator, and in the
morning the fat will rise to the surface
and congeal and can be easily scraped
off. It's very easy to clean. Remove this
attached strainer, tilt the kettle, and
with the optional hose assembly spray it
out in the tilting positions. Add a
little water. Turn the kettle on. To get
some heat, add some detergent. Bring the
water up to temperature and scrub it out.
The k-series kettles deliver the quality
and workmanship and durability that you
expect in a Vulcan-made product.
-------------------------------------------
Salon HIT 2017 : l'offre santé de NextiraOne et Microsoft - Duration: 2:07. For more infomation >> Salon HIT 2017 : l'offre santé de NextiraOne et Microsoft - Duration: 2:07.
 -------------------------------------------
Une Sombre affaire de Drogue sur Youtube - L'Hebdo #95 - Duration: 12:50. For more infomation >> Une Sombre affaire de Drogue sur Youtube - L'Hebdo #95 - Duration: 12:50. -------------------------------------------
MOOC L'instant figé au Louvre - Entrez dans la danse 3 - Duration: 1:58. For more infomation >> MOOC L'instant figé au Louvre - Entrez dans la danse 3 - Duration: 1:58.
 -------------------------------------------
2015-2017 F150 Barricade Brush Guard Review & Install - Duration: 3:23.
What's going on, guys?
I'm Alex from American Muscle.
This is my quick view and install of the Barricade Brush Guard in Polished Stainless fitting
the 2015 and 2016 F-150.
So in this video, I'm going to talk about the construction and materials used with this
brush guard, as well as a little bit later on the installation.
But right off the bat, despite this size, I'm going to be giving this a very easy one
out of three wrenches on the difficulty meter, and you should have this on your truck in
about an hour, tops.
So if you're the owner of a brand new F-150, and you're looking to maximize the protection
over that of a bull bar, I would definitely suggest taking a look at this brush guard.
As you're going to be offering the maximum amount of protection for your headlights and
your grille from anything you might come across, be it on your daily commute, job site, or
even doing some heavy-duty off-roading.
So, taking a look just at the materials alone we're gonna see that this is made up of a
heavy-duty stainless steel tubing which is then polished to a mirror finish.
Now, in my opinion, this meshes very well with the factory trim on the F-150.
But if chrome isn't your thing, you can definitely take a look at some other options on the website
where we're going to have this listed in black.
So the great thing about this finish on this brush guard is that it's going to hold up
over time to any type of exposure to the elements.
But I would add that with any type of chrome parts that you're gonna have on your vehicle
it's always a good idea to wax it every now and then, just to ensure it's gonna have a
great shine as well as be protected.
All right guys, so taking a look at the pricing here we're going to see that this is going
to fall in line right around the $500 price range, which is definitely gonna be in the
middle of the road in comparison to some of the other big-name brands out there.
Now they could easily tip the scales at around $1200 based on their style, finish, as well
as how they're optioned.
Now, for the money here, you're definitely getting away with a huge bang for the buck
as you're going to be giving your truck the maximum amount of protection, protecting your
headlights, your grille, and your front end either on your daily commute, running off-road,
or your job site.
Now, again, just to hit this home one last time, for the money here you're definitely
getting away with a huge piece of equipment that's going to protect your investment from
anything that you might be coming across on your daily commute.
Doing some light to heavy-duty off-roading, as well as making this look that much more
aggressive and different than any other F-150 you're going to be seeing on your daily commute.
So taking a look at the installation here guys, just like I had said in the beginning
of the video, you're gonna be looking at a pretty easy one out of three wrenches on the
difficulty meter and about one hour, tops, to get this on your truck.
Now, while it's not completely necessary to have a second set of hands here to get this
installed, I would definitely suggest doing it as this is gonna be a little bit on the
heavier side and it's always a good idea to just have them there.
All right guys, so one thing I do want to add, during the installation is that while
Barricade suggests that you don't need to pull the grille to install this.
I would definitely suggest taking the extra 10 to 15 minutes to do it, as getting access
to the top bumper bolts for the brackets can be a little bit on the challenging side as
there's only about this much space to get a hand down there.
Again, take the extra 10 to 15 minutes, pop out your factory grille, and it's going to
make your life that much easier when getting this on your truck.
All right guys, so just to wrap things up here, I really like this option from Barricade,
not only because I have a couple of their parts on my own truck, but for the fact that
you're going to be getting away with a piece that not only looks tough but actually is
tough.
You're going to be protecting the front of your brand new truck from anything that you're
going to come across on some light to heavy-duty off-roading, job site, farm, or even on your
daily commute.
So that's my review and install of the Barricade Brush Guard available in polished stainless
fitting your 2015 and 2016 F-150 right here at americanmuscle.com.
-------------------------------------------
2015-2017 F150 T-REX Billet Series Replacement Upper Grille Review & Install - Duration: 3:23.
Hey, what's going on guys?
Adam here with americanmuscle.com.
Today I'm bringing you a detailed review and install of the T-REX Billet Series Replacement
Upper Grille, available in your choice of either black or polished finishes, fitting
all 2015 and newer F-150s.
In this video, I'll be going over the styling and appearance you can expect out of the T-REX
Replacement Upper Grille, as well as the materials and construction.
I'll top everything off with the installation, which I'll tell you up front will get a solid
one out of three wrenches on our difficulty meter.
Let's get right into it.
The T-REX Billet Series Replacement Upper Grille in either black or polished finishes
will be for all 2015 and newer F-150 owners out there looking to pick up one really aggressive
appearance for the front end of their F-150, while also getting either the blackout look
or the polished show car look for a very affordable price.
The T-REX Billet Series grilles that I have here today offer a very unique styling that
the factory option didn't offer.
This one will have the 32-horizontal bar design with no logos on the face, giving a very sleek
blackout design if you go with the black option, or if you want to go with the shiny eye-catching
show car finish, you go with the polished option.
One thing I do want to point out before we go any further is that this one-piece design
from T-REX is unfortunately not going to work with forward facing cameras.
You might want to check out some of the other options on the site to really fit your needs.
One of the great bonuses about picking up this option from T-REX is obviously going
to be the materials and construction which T-REX is known for having really good quality.
This one is going to be manufactured right here in the U.S.A. using the original CAD
data from Ford to ensure a perfect fit on the front end of your truck.
With that said, it was also constructed out of high quality, lightweight, aircraft grade
6061, 6063 billet aluminum for durability, all completed in, of course, your choice of
either the black powder coating for corrosion resistance or, of course, the polished aluminum
for that bright mirror-like shine.
Now because they really have confidence in their parts here, T-REX is covering this under
a limited three-year warranty for the workmanship to give you peace of mind in case there are
any defects in the materials and, of course, that solid finish.
If the T-REX Billet Series grilles I have here today, either in the black option you
see here or the polished option you can find on the site, expect to be spending just about
$400, which in all honesty will fall at the top end of the spectrum for the pricing compared
to other options on the market.
But, of course, you are paying for the higher quality materials that we all expect from
T-REX, and you are definitely getting a lot of bang for your buck with the appearance
here.
Now, shifting gears over to the installation portion of the video, this one again will
not require any drilling or permanent modification to the front end of your F-150, and you'll
only need a simple ratchet and socket set to get the job done, something anybody can
do with just a little bit of time in the driveway at home.
I'd say about an hour tops to get this one done, definitely getting a one out of three
wrenches on our difficulty meter.
You do want to keep in mind while doing the installation that this one from T-REX is not
an overlay.
It will be a complete replacement for your factory upper grille.
Once you get that factory upper grille out, you'll be replacing this one and locking it
down using the fender washers and lock nuts provided in your kit, securing it to the front
end of your F-150.
Overall when you're done, like I said, about an hour's time, a one out of three wrenches
on our difficulty meter.
Just to wrap things up, guys, if you're the owner of a 2015 or newer F-150, and you're
looking for a way to get some of the top-notch materials for an aftermarket front upper grille
while getting a durable blackout finish or a polished show car finish, you might want
to check out the T-REX Billet Series Upper Grille Replacement, which, of course, are
both available right here at americanmuscle.com.
-------------------------------------------
2015-2017 F150 Barricade 3" Side Step Bar Review & Install - Duration: 3:44.
Hey, what's going on guys?
Adam here with americanmuscle.com.
Today, I'm bringing you a quick overview and installation of the Barricade Three-Inch Side
Step Bar with 90-degree ends, in the polished finish available for all 2015 and newer F-150s.
So, in this video, I'll be going over the functionality and styling of the Barricade
Three-Inch Side Step Bar, as well as materials and construction.
I'll top everything off with the installation, which I'll also let you know will probably
simple enough for any novice to take care of, and we get a one out of three wrenches
on our difficulty meter.
So, the Barricade Three-Inch Side Step Bar with the 90-degree ends in the polished finish
I have with me today is gonna be for all 2015 and newer F-150 owners out there, looking
to switch out their factory side step bars.
Or add something to their naked F-150 by also switching up the styling with the 90-degree
ends with this particular option from Barricade, to overall give it a more aggressive look
while keeping the same thickness.
Now, obviously side step bars have the main function of helping you get in and out of
your truck especially useful with a lifted setup, but of course also adds a stylistic
aspect to the sides of your F-150.
Now the stock size, if your F-150 did come with sidesteps, is gonna be a Three-Inch tubing
which is exactly mimicked in this particular option from Barricade.
The only difference with this one is obviously the bright, attractive polished finish, really
grippy pads, which I'll touch on in just a bit, and a 90-degree bent end on either side.
Which is very unique from the stock options, which will actually bend in a little more
uniquely to under your doors.
Now, as far as materials and construction goes, here just a little bit further.
This was manufactured out of a Three-Inch stainless steel tubing, giving that oval shape
throughout similar to your stock option, but is set apart thanks to the 90-degree ends
which give it that unique shine to tuck under your doors a little bit differently.
Also with that said, you've got slip-resistant gripping pads here with a tread-like pattern
given all year round safety and security, making sure you're hopping in and out of your
truck very safely whether it's wet or dry weather.
Now, again to finish that all off, it's finished in a mirror-like polished shine for that attractive
finish giving you good looks all year round.
Now, I do wanna point out that this is sometimes referred to as protection for the sides of
your F-150.
Now, although I do slightly agree with that, I would not completely rely on these as full
on side armor against the big trail hazards out there, but again, will protect you from
smaller rocks and even door dings in the parking lot.
So, keep that in mind when shopping around.
Now, if this is something that piques your interest, this one is gonna be a very budget
friendly item here on the site.
You can expect to pick this up for just shy of 150 bucks.
You are getting a lot of bang for your buck materials with the stainless steel, but of
course, is bringing the price down thanks to the fact that it is very similar to the
stock option.
If you're trying to stray away from that stock option, there are a lot of unique options
on the site, but if you're looking to stay in that stock range with 90-degree ends here
to give it a little more unique flare, this one might be for you.
Now, as far as the installation goes like I said in the very beginning, this one is
gonna be simple enough for any novice to take care of with a few simple hand tools like
a ratchet and socket set.
It will not require any drilling or permanent modification, and it comes with all hardware
necessary to get the job done.
You'll be mounting the brackets on the preexisting mounting studs, located on the interior wall
of your rocker panel.
From there, tighten down those brackets using the hardware provided in the kit, then place
the sides step onto those brackets on one side of your F-150, tighten that down by hand
and then repeat the process to the other side of the truck.
Tighten all the hardware down to spec at 15 to 20 foot-pounds, and you're good to go.
Overall, about an hour's worth of time on the install, and a one out of three wrenches
on our difficulty meter.
Just to wrap things up here, if you're the owner of a 2015 or newer F-150 and you're
looking for a very budget-friendly item to help you get in and out of your truck especially
if it's lifted, while not straying too far from the stock option.
You might wanna check out the Barricade Three-Inch Side Step Bar with the 90-degree ends in the
polished finish, available right here at americanmuscle.com.
-------------------------------------------
2015-2017 F150 T-REX Torch Series Upper Grille w/ 30" LED Light Bar Review & Install - Duration: 4:09.
Hey what's going on guys?
Adam here with americanmuscle.com.
Today I'm bringing you a detailed review of the T-REX Torch Series Upper Grill with 30-inch
LED Light Bar in black, fitting all 2015 and newer F-150s.
In this video, I'll be going over the functionality and styling you can expect out of the torch
series upper grill I have here with the LED light bar, as well as the materials and construction.
Toward the end the video, I'll take you through the installation which I'll tell you upfront
will get a two out of three wrenches on our difficulty meter, simply because it does require
a little bit of custom wiring, even though it doesn't require any drilling or modification
itself.
So, let's jump right into it.
The T-REX torch series upper grill with the LED light bar in black, is gonna be for the
2015 or newer F-150 owner out there looking to pick up a very aggressive appearance for
their front end, while also picking up an accent lighting that will light up the entire
trail or job site.
The T-REX upper grill I have with me today is definitely gonna be one that stands out
from the other options on the market, and it obviously will be reflected in the price,
which I'll touch on it just a bit.
This one offers a diamond wire mesh pattern bordered by stainless steel rivets for accent
and styling, as well as a 30-inch long LED light bar with high powered lights inside,
flood and spot beam styling to light up the entire off-road trail.
So, the grill itself offers that mesh pattern design that some people love, some people
hate.
I myself think that this one is a very aggressive appearance for the front end of F-150s.
I think I would pick it up myself if I did own one of those trucks, but unfortunately,
I'm not one of those lucky owners.
Now, with the grill itself, it does offer the four diamond shapes per square inch as
well as the X-metal studs all around the perimeter, and the metal X logo embedded into the materials
here.
This one is gonna be a complete replacement for your factory upper grill, so expect to
have to remove the entire thing to get this one installed properly.
Now, the LED light bar is 30 inches long and offers those flood and spot beam patterns
that are very high quality, very bright LED lighting that is sure to illuminate your job
site or off road adventures and then some.
Now with that said, this one is going to be considered straight for off-road use only,
and will not be street legal in most areas, but of course you wanna check with your local
laws and regulations about the extra lighting fixtures just to be safe.
Now, as far as materials and construction goes here, expect all OEM CAD data used directly
from Ford to ensure a perfect fit on the front end of your F-150.
Manufactured using a 304 stainless steel of course for strength, all using 12 gauge diamond
wire mesh, fine woven patterns here, for durability, long lasting use and of course that black
powder coated finish for corrosion resistance.
Now, moving along to the pricing aspect of this product from T-REX.
You can expect a whopping $1,500 price tag.
Now of course, that one is a very expensive price tag, one of the most expensive on the
market today for your F-150.
Now with that said, you do wanna keep in mind you're getting top notch materials directly
from T-REX, who typically offer some really good products for the front end of your F-150
and exterior appearance all around.
And with that said, it also comes with that 30-inch LED light bar already pre-installed
into the front upper grill.
And of course, that adds a lot of bang for your buck here.
This one is gonna be catering toward the guys out there willing to spend the extra money
to get the extra visibility on the job site, and of course, hitting the extreme off-roading
trails.
Now, shifting gears over to the installation portion of the video.
Like I said in the beginning, this one does require some custom wiring to get the LED
bar installed.
Now, it is recommended to wire it into a custom switch to have its own on and off, but then
again, it's all up to you if you wanna wire it into your fog lights.
You do wanna keep in mind while you're doing the wiring, this one is intended for off road
use, so you don't really want it coming on with your daytime running lights.
Now with that said, if it wasn't for the LED bar, I would give this a one of the three
wrenches because the grill itself is very simple to install.
Because the wiring is involved, I'll be giving it that two out of three wrenches on our difficulty
meter, and I'd say about two hours worth of time in the drive way at home to get it on.
Well guys, just to wrap things up here if you're the owner of a 2015 or newer F-150
and you're willing to spend the extra money on a very high quality front upper grill with
some accent lighting to light up your off-roading adventures and your job site, you might wanna
check out the T-REX torch series upper grill with a 30-inch LED light bar in black, available
right here at americanmuscle.com.
-------------------------------------------
2004-2014 F150 Rhino-Rack Vortex 2500 2-Bar Roof Rack Review & Install - Duration: 4:03.
Hey, what's going on guys?
Adam here with americanmuscle.com, and today I'm bringing you a detailed overview of the
Rhino-Rack Vortex 2500 Black 2 Bar Roof Rack fitting all '09 to '14 SuperCab and SuperCrew
F-150s.
So if you're the owner of a SuperCab or SuperCrew '09 to '14 F-150 and you're looking for a
way to carry some extra cargo safely on the roof of your truck, you might be interested
in the Rhino-Rack Vortex 2500 Roof Rack system I have here today in black.
If you're the type of truck owner who likes to go on long road trips and needs the extra
storage room for your luggage, or maybe you or the kids are into extreme sports and need
some room for your mountain bikes and kayaks, maybe you just wanna free up some leg room
in the cab, then you might need a strong, reliable roof rack system like the one from
Rhino-Rack.
So the Rhino-Rack 2500 Vortex Roof Rack system is made to fit perfectly on the roof of your
F-150, molded to the contours of the body style, and offers a bare roof style mounting
so you know it's made to fit perfectly and look good right out of the box.
So this kit obviously offers two bars as you can see here on the table that offer an overhang
style of attachment, which basically means that with the brackets, these will overextend
past the point of attachment with the door jam.
Now if you're not really interested in the overhang style attachment, then maybe you
wanna check out the 2500 RS Rhino-Rack system that is also available on the site.
Now like I said before, the kit offers two bars, one for the front, one for the rear,
obviously, that offer removable fixtures that allow you to hook into the door jams.
And this kit pretty much comes preassembled right out of the box, with the exception of
the actual bracketing system you see here.
Now the kit also has wind-reducing VGS strips like you see here on the vortex bars, and
as I mentioned before, offer that overhang over the fixtures.
Now the bars are manufactured using structural-grade UV-treated anodized aluminum with H-shaped
internal extrusions that don't weigh them down and give it structural support overall.
Now it was coated in black for a durable, sleek finish, but also for long-lasting corrosion
resistance, which is great to make the bars useful all year round.
Now the bars are 1,500 millimeters in length, and as I touched on earlier, offer rubber
strippings on the top with the vortex waves to actually reduce wind noise, making it a
more aerodynamic option for your vehicle, and they actually blend in really nicely with
the curves of the car, making it for a from-the-factory styling, which is definitely beneficial when
adding something to your roof.
Now all the installation hardware needed is included in the kit, including pads and clamps,
as well as a locking pad as you can see here that will take the key also included in the
kit.
When that's finished, it'll look like this to add some very good safety and security.
Now price-wise for this kit, you can expect to be spending just about $400, making it
actually a pretty decent price considering it's an all-inclusive kit for a very simple
install that includes locking pads as well for added security.
Definitely a lotta bang for your buck with this kit.
Now before I jump into the install, I do want to point out that, like I said, this is a
black finish, but if you're not interested in this styling, Rhino-Rack also offers the
2500 Vortex system, same kit I have here but also in silver, just in case you're interested
in a different style.
Now to kick off the installation, you wanna screw in the bolt and bracket to each end
of the front roof rack bar by tightening it down by hand.
Now next, you'll install the padding to the bottom of the roof rack system on each end
to make sure you're protecting your door jam from any damage caused by the connection.
Now once that's in place, you'll take the front roof rack and put it on top of the roof
and connect the one end to under the door jam under the weather stripping.
Repeat it for the other side as well, and then for the rear, making sure they're the
middle of the door.
There is a specific length that your front roof rack and your rear roof rack are supposed
to be apart, which will be specified in your instruction booklet that will be provided
for you in the kit.
Once you've figured that out and you have it all measured, you can torque down the bolts
to spec using the tool provided as well.
Now to finish it off, you can put each padlock on each end of the roof rack system and lock
them using the supplied key, and you're good to go.
Overall, you're looking at spending about an hour or two on the install, and I would
definitely give this a one out of three wrenches on the difficulty meter, making it something
anybody can do with a little bit of time in the driveway at home.
Just to quickly wrap things up, guys, if you're the owner of an '09 to '14 SuperCrew or SuperCab
F-150 and you're looking for a way to expand your truck's storage capacity, you might wanna
check out a set of the Rhino-Rack Vortex 2500 Black 2 Bar Roof Racks available right here
at americanmuscle.com.
No comments:
Post a Comment