hey crafters it's Amanda here and welcome back to crafters autonomous so
I've got a really fun tutorial this Tuesday I'm really excited about this
one because it has to do with Christmas I am like so ready for Christmas we've
actually been having some cold weather so I'm really excited about that's a
nice crisp November day but what I've got today
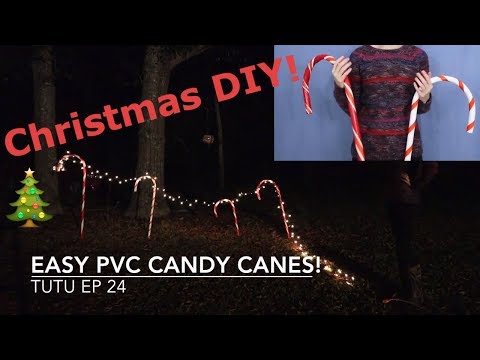
is an awesome super easy Christmas lawn decoration and I think you're really
gonna like it so we're gonna start off with an ordinary piece of PVC pipe this
is 3/4 inch diameter we're gonna start off with our straight piece 1 long piece
of PVC pipe bend it so it's shaped like this paint it so it's nice and white and
turn it into I can't be keen and this is just one of the many styles we will be
making today so super cute really easy but you might have one question at this
point how do I make this big long piece of PVC pipe look like this and you know
what this didn't take any cutting it didn't take any additional pieces it's
just the same piece of PVC pipes and the trick to this tutorial is a heat gun so
I've got his heat gun by Wagner here and I'll go ahead and put an Amazon link to
it down below in the description so make sure you click on that if you want to
get one this one runs about 25 bucks on Amazon but depending on what kind of
what style you guys you can get a froze low as $15 or even get better quality
wants for more expensive I've been really happy working with this one so
I'll have a link for this one down below and basically a heat gun is like a super
intense hairdryer and so I just blows heat we're going to use this to heat up
our PVC because PVC is just a plastic and it's going to start to melt it a
little bit and it'll make it soft and pliable now having said that there's two
things we want to do because safety is of utmost important when using tools
like this the first thing is because we're going to be melting a plastic work
in a well-ventilated area because some plastics the fumes they give off as they
melt or as they burn aren't the best to directly breathe in
so I'm in a workshop barn turf at the door it's open nice and airy air is
moving today so that's the first thing you
to keep in mind the second thing you want to keep in mind is this can
seriously burn someone you know a hair dryer you turn it up to high you know
you kind of get a little bit out on your head but we're not talking hair dryer
here we're talking very intense heat okay guys I've got these big gloves here
and I think these might be welding gloves these are gloves my dad uses with
his big green egg grill which by the way I'm not sponsored by big green egg but
you should get it free community because it's so good so anyways these are what
he uses what he's reaching in there so these are really great gloves so you
definitely want to have some kind of protection on your hands because we are
going to be touching the PVC pipe when it's warm to help shape it so you do not
want to reach out and grab with your hand big no-no so definitely have gloves
on and that'll also protect your hands if you accidentally point the heat gun
towards your hands you'll also notice I'm wearing long sleeves I've also got
pants on close toed boots on so except for my face I'm not gonna really have
any skin exposed and that's just as a precaution so I don't burn myself
I don't want anybody ending up in the ER this close to Christmas that's not what
needs to happen so you just make sure you use your tools safely and having
said that that's pretty much all we need to know I've got a couple random other
things like a pencil and a tape measure that will help us later on we are going
to spray paint the bend and then as a final step we're going to make the red
stripe using some tape but for now all we need to do is we need a first shape
our PVC pipe alright so I'll go ahead show you what my basic setup is here
I've got this nice Hardware in trough that I just grabbed some different boxes
cut the flap top take them together and now they're creating this trough and I
just coated it in aluminum foil and the purpose of this is we can set the PVC
pipes down in here kind of bend it close it helps if you have someone to help
kind of fold the cardboard vent over and now I'm using the heat gun it just helps
it heat up faster for the sake of filming this I'm not gonna worry about
bending it over I'm just gonna leave it sitting in here so I just got this set
up on my saw forces here and what kind of leaves leave this angle towards the
camera but if this 50 is if you want to rig something up like this it will help
the process go a lot faster just because it will help insulate the PVC pipe as
it's heating up so you can do the bin really easily really smoothly but if you
don't that's okay as far as what kind of surface you want to work on you want to
work at an area that can get hot so you may even want to just put aluminum foil
down on whatever you are working on maybe put a sheet of card bra underneath
that just to make sure you don't damage whatever surface you're working on I
just got this spread out across two sawhorses up here in the workshop barn
so that's basically my setup and before we need to put our gloves on and start
using the heat gun we need to just make some quick marks on our PVC pipe and
this is going to help us make it better more consistent Bend so I just got a
tape measure here and I'm gonna measure out to about two feet that's about how
much length you want for your bin so I'm gonna start by marking it at the 12 inch
1 foot mark here and just get the pencil just rub it on there and then I'm gonna
mark down two inches or so from there and these are gonna be my guide lines
because the 12 inch here in the middle that's all at the top of the pen tepee
and then I'm gonna have matching guides on either side so when I bend here at
the middle this mark and this mark I want to kind of get them lined up in
even with each other and that'll make a lot more sense once we're actually
bending so I'm just making some marks down the length of it so my marks I
started the 12 and then I want two inches on either side of that so at the
10 and the 14 and to make the rest of my guide marks I went three inches and
three inches this way from my 10 inch mark I went three inches to the 7 inches
and then another 3 inches to the 4 inches so I've got a total of seven
marks here one in the middle and then three guides on either side you also
want to mark the 24 inch spot because that line that you draw the 24 inch spot
you want to line up with the end of your TV when you're bending so now it's time
for the fun part where we get to use the heat gun and I'm going to put on my nice
gloves all right I'm gonna talk through some of these stuffs before I started
doing them so you country hear what I'm saying because this thing gets a little
bit loud kind of like a hair dryer I'm going to turn my heat gun on this one
has two settings so I'm gonna go up to the highest setting just to speed the
process up a little bit and when it's on I'm going to come down this whole length
a little bit beyond the 24 inch mark all the way to the very end
I'm just gonna go back in for it's kind of slowly pretty close you can see I'm
not way back here you also don't want to touch it because if you touch it you
will burn it and so it can cause some different marks and things to appear
it's not a huge deal if you bring it because we are going to be painting over
it but it's just nice to not burn it so I'm just gonna go back and forth like so
hoarding it pretty close I'm going to roll this back and forth so though I'm
not just getting one side melted but the other side and it's still cold just kind
of keep going back and forth this whole link for it's probably gonna take about
five minutes this part because what we want is we want it soft enough so now
that we can take it and we're just gonna push it and it's gonna create the bend
and now we're just gonna grab the PVC pipe with our gloves on and will shape
the bend really simply so now that you have a basic idea what we're doing I'll
go ahead and start doing this I'll probably speed up most of the heat gun
part just because you probably don't want to watch me going back and forth
for five minutes but then I'll show you how the PVC pipe will be soft and
malleable and we'll be able to bend it in shape
we're getting close you can see I've already put a little bit of a bend in it
they're just a lot more and then I'm gonna really shape it alright so this
part is where you want to be fast while it's still warm but keeping track of
where my 12 inch mark is I'm just gonna bend it back on itself like so now I
might start shaping kind of weird but this is the part where because it's soft
you can kind of play with that I found that it really helps to do the bend on
if you bend it too sharp on one spot it will start to go flat there so you want
to avoid doing that but you can rend it a good bit as always so mine I need to
heat this bit here so this can bend some more I'm gonna grab my heat gun keep it
a little bit more there and then just keep sending it back this part here soft
you can see how easy it is for me to bend and I'm just gonna pull this part
over shape it and there's really no science to this other than you melt
plastic and while it's soft you bend it so really simple your candy canes won't
always turn out 100% perfect but I kind of like them threatening out you know a
little bit each a little bit different but as always you can keep melting them
more and more just to reshape it so if you find a part of the shape that you
don't like just reshape it but you can definitely see the candy cane shapes
trying to form you know sometimes I had one that I did earlier no on the first
try I had it you know it was all long and I just slowly took it or bent it
over and it got this perfect shape so sometimes that will happen it's just a
little bit of trial and error the more you do make these the easier it gets and
as always if you're not happy with your shape like this I'm gonna rework just a
little bit just heat it back up again and I'm gonna fix this part of the bend
right here and then we'll move on to the painting part of this process
all right so I finished painting my candy canes and now I'm gonna throw out
a couple things here when I was painting because of the weather
and just different factors the painting with the spray paint wasn't my best
option to go with so I did a couple coats in the garage with a setup that I
had but I wasn't satisfied with how that was coming out so if it were in a warmer
month like you got these done over the summer or in the fall or if you live in
Florida or something like that then spray painting that's probably
gonna be your easiest option however I was still ending up with lots of areas
where you could see like the names of the and the sizing of the pipe still on
here so I wasn't happy with that so I grabbed my nice Apple Barrel it's just
this acrylic paint it has this really cool gloss finish and it's great for
indoor outdoor use I'll put a link for it in the description below but I went
ahead and I started using that to touch up spots but then I really liked how the
gloss look was turning out so I just ended up painting the whole thing by
hand with the gloss acrylic paint now having said that there was still some
benefit to spray painting because I didn't have to do as many coats by hand
however it's not a big deal to do it by hand it doesn't take nearly as long as
you think you just want to use the same techniques where you do thin coats let
them dry completely before you do the next one and I probably only did about
two maybe three coats with the acrylic paint it covered really nice and so I'm
really happy with the shine and it really just finished it off nicely if
you are looking up close you might notice some spots like here where
there's a bit of a paint run and that just from this combination of
spray-painting a little too heavy and with the setup I had and then going over
it with the acrylic paint however it's not a big deal because you're not gonna
be looking at these that close like I like setting them like wow that's a big
paint smear you're gonna be looking at it from a distance because they're gonna
be in your yard so just to you know put your mind at ease if the paint job
doesn't look the best it's gonna totally end up okay but anyways now that we've
got these painted it's time to move on to the fun part where we add the stripes
and they start looking instead of just like but if you BC they start looking
like really awesome candy canes so I've got two things I've taped with me
today I've got this nice just normal roll of duct tape and the red color and
then I've got this really cute it's a little bit more orangie than the big
role but it's duct tapes washi tape crafting tape so I'm gonna use both of
these because they're not exactly the same color but they're close enough but
also off enough that are kind of like just add a little more color to them but
then I can do some bigger strive some thinner stripes some of both on them so
just make it really cute but I'm gonna start with my big roll of duct tape so
there's not much to it other than you tape it up however two words of caution
one go slowly because it will peel off really nicely that's what is nice with
the glossy finish is that you do have a little bit of play before you really
squeeze the tape down and it getting stuck but the other thing is you want to
make sure you kind of start coming almost straight up the candy cane so I'm
just going to start peeling my roll of duct tape here and I'm going to start at
the long end because when you do the hook part it does get a little goofier
it's not as crisp and clean looking so that's why I feel like it's better to
start at the long end so as I said I'm not gonna angle it like this I'm gonna
come at a pretty severe almost parallel angle and that's gonna make sure that
it's able to wrap now when you go to start taping it might get bubbles and
that just pop it up and that's why saying the key is to go slow you can
also let the hip tape hang down a little bit just gently work it on finger it
helps to have a good bit of sock you don't like too much slap but if you have
a little bit of slack on the roll doesn't get in the way as much but just
start taping around and again these are gonna be in your yard so people are
gonna be looking at them super up-close so you do have some forgiveness there
it's not like if you have a little air bubble that everyone's gonna see me like
wow they totally mess up so there's a lot of forgiveness in the taping job
just go slowly get it to look how you want as I get it on here I'll come back
and kind of push the air bubbles out but for now I'm just mainly trying to get it
on here what about this my slack and the tape can almost let the tape hang down
there just kind of twirl for candy cane so I'm almost to the curl here okay now
when you get here things are gonna go way less Chris
pristine on this end that's okay what I found works best is to peel off some
slack and the trick is you want the center of
the tape to land on the candy cane and you can kind of guide it wherever you
want it to go and then these edges that are kind of sticking up and aren't
laying down just smush them down it'll all look okay in the end so again here's
I'm coming to the underside you can see that it's kind of getting caught on
itself that's okay I'm just going to keep wrapping it see it's really bunch
of there but in the end it's all gonna be okay I'll just push that down and
once it's in the yard you really won't notice big bumps like that so obviously
you don't want to do just a reckless job but it's okay if it doesn't lay
perfectly down on this curve because we're really not going to so I'm just
gonna keep slowly peeling down some excess just keeping that nice angle so I
don't overlap the tape we're getting to the end here peel off a little bit more
okay with how it's turning out just peel it off you've got a good bit of
forgiveness dough that kid is really sticky so if it catches on itself that's
a little harder but you can make it work
all right here we go we're almost at the end keep coming around like so and roll
off now we are to the end so the last thing I'm gonna do is I'm just gonna cut
the tape off here all right so for the sake of fullness I've kind of got over
my shoulder but you can see that I've got a little bit left here so I'm just
going to take my EBT scissors and cut off just leave a little bit of excess
and I'm just gonna smooth this down so it has a nice edge and then all this
extra stuff I'm just gonna tuck it up inside the PVC pipe push it up in there
I'll also come back down to this end do the same thing push my excess tape
down in there and check it out you guys it's the candy cane super easy super
fast once you do one of these you'll be able to crank them out a lot faster
what's also nice about this project is you can work on a bunch on at the time
too really speed up the process so it's like
if you're doing three doing two more at the same time doesn't really take that
much longer so you might as male and make like thirty of these you know and
fill your whole yard with the candy cane forest you know maybe buddy the elf will
come for a visit so I'm gonna finish taping up the rest of my candy canes and
then we'll check out how they look outside to the world and there you go I
am so happy with how this project turned out it looks really cute you can do it
with the lights when I thought the lights I just went ahead found a string
and wrapping them around the top you could also if you did this with thicker
PVC pipe you could also drill holes in the side periodically and feed the
lights up through there that would be really cool that would make the candy
canes themselves line up but either way even with just the light strand draped
over it I think it likes super cute I'm really happy with how this turned out
it's really not too hard to throw together not that expensive and it's way
more fun than spending a ton of money and searching online and trying to find
candy canes like this and plus you can customize these that's what I love you
know I pictured like a candy cane forest obviously just like the trees in the
forest aren't gonna be all the same they're all the same height these are
all have their own striping pattern their own characteristics so I think
it's a really cute way to decorate for Christmas so I hope you guys enjoy this
tutorial and enjoy getting to see the finished
look and so there you go now you can make these really fun candy canes
decorate your yard create a whole candy cane for us and I hope that this is
pretty easy for you guys and I hope that you have a to follow along but as always
if you have any questions or things you're not quite sure about comment
those below I check comments every day so I will be sure to get back to you as
fast as I'm able to but if you do make these let me know how they turn out I'd
be really excited to hear how this project goes for you guys and as always
if you enjoy this video give it a big thumbs up I would greatly appreciate it
and if you haven't already make sure you hit the subscribe button because then
gonna get more awesome festive decorating ideas I've got lots of things
in mind for these holiday seasons as Thanksgiving comes up and as Christmas
comes up so you don't want to miss those so make sure you hit the subscribe
button if you haven't already but until next time I hope you guys have a great
week and happy crafting so in my last moments here you might be wondering
what do you do with these during the rest of the year well fortune to light
and I'm not too big so you can storm very easily but if you don't have
storage solutions you can use them as props let me demonstrate
barbershop quartet Oh Saint Nicholas lean you're in this way you can also
pretend you're older than you actually are
dad and they're also great for comedy why did the chicken cross the road take
out to the other side
 For more infomation >> GeekFest - Duration: 3:32.
  For more infomation >> Makaron şirniyyatı. How To Make French Macarons - Duration: 7:30.
  For more infomation >> Collab Nailtube Marble 🔮 (English Subtitles) - Duration: 7:01.
  For more infomation >> Аниме приколы под музыку #30 | Анкорд жжет |anime crack |Аниме моменты |Аниме музыка (Specially) +18 - Duration: 4:49.
  For more infomation >> 리액트, 리덕스로 타이머 앱 만들기 : #10 Creating the tomato reducer - Duration: 16:19.
  For more infomation >> 15歳になってから初のライブ放送!(詳しくは説明欄にて!) - Duration: 1:08:49.
  For more infomation >> Game Night Movie Trailer
 For more infomation >> Audi A1 1.4TFSI/185pk AMBITION S-LINE PRO LINE BUSINESS AUTOMAAT|2012|Navigatie|PDC|17" LMV|1/2 lede - Duration: 0:54.
  For more infomation >> Hillary (LMvsMonde2) très proche de Bryan de Secret Story 11, ils s'affichent sur les.. - Duration: 2:15.
 For more infomation >> Bridge remains closed - Duration: 2:04.
 For more infomation >> MINI、初のDCT&新ターボシステム搭載へ…クーパーS が超進化 - Duration: 1:38.
  For more infomation >> 벤츠, 2018년형 S클래스 마이바흐 - Duration: 2:09.

 For more infomation >> Nouvelle Star : Shy'm a refusé d'être juré à cause de Danse avec les stars - Duration: 2:13.
  For more infomation >> Nicolas Bedos pousse un coup de gueule contre les César à cause de Doria Tillier - Duration: 2:42.
  For more infomation >> Jenifer: qui sont les hommes de sa vie qu'elle protège tant? - Duration: 2:33.

 For more infomation >> Le suppo de Satan ! - Duration: 2:47.
  For more infomation >> Jean Dujardin va faire son retour à la télévision dans une série réalisée par - Duration: 2:10.
  For more infomation >> - #EnjoyTheDay - 031 Les rituels de notre entrepreuneur à barbe violette - Duration: 4:34.
  For more infomation >> MINI、初のDCT&新ターボシステム搭載へ…クーパーS が超進化 - 日本のシンプルなもの - Duration: 1:27.
 For more infomation >> Kia cee'd 1.6 GDI DYNAMICLINE Nav. Clim.contr. - Duration: 0:59.
  For more infomation >> Mercedes-Benz C-Klasse C 220 d Limousine Automaat Avantgarde - Duration: 0:54.
  For more infomation >> Mercedes-Benz E-Klasse E 220 d Limousine Automaat Lease Edition - Duration: 1:01.
 For more infomation >> Kia cee'd Sporty Wagon 1.4 CVVT SEVEN | NAVI | TREKHAAK | - Duration: 0:59.
  For more infomation >> Les fruits qui nous donnent de l'énergie - Duration: 2:30.
  For more infomation >> Monsta X (몬스타엑스 ) - In time [VOSTFR] - Duration: 3:16.

 For more infomation >> Catherine Ferland découvre les Collections du Musée de la civilisation - Duration: 2:42.
  For more infomation >> Régime de 13 jours pour perdre 8 à 10 kg - Duration: 3:56.

 For more infomation >> Bobby's Parker House Rolls | Food Network - Duration: 3:27.
No comments:
Post a Comment