What is going on guys this is Roy.
And welcome to another headphone fixing video on this channel
I already made couple of video. May be 4 – 5 video about headphone.
So if you want to watch them link is in the description below.
Tag fila send me a video a video on Facebook.
This is the video. Basically his headphone is broken from here.
And one ear earpiece is working and another one is not working.
So in this video I will show you how we can fix it super easily.
Right side is working but left side there is no sound.
The most important tool you need to fix your headphone is a soldering iron.
So I am using this soldering iron.
I bought if from baggood.com.
It also has a temperature control.
You can control the temperature between 200 to 450 degree Celsius.
It also came with 5 additional tips.
And this one is my first soldering iron.
I bought it near about 5 – 6 year ago. Still working
If you are from India. You can buy it from any local store.
Cost you may be maximum 200 Indian RS.
Its 25 watt its awesome.
Inside this cable there is there wires.
One is left channel, another one is for right channel and another one is ground.
And over a period of time wire inside this cable get broken.
And your headphone stopped working.
From here cut an inch or half.
I am cutting it from here
Now you need to cut the jack from here.
If you already have a new jack, you can use it.
But I am going use the same jack.
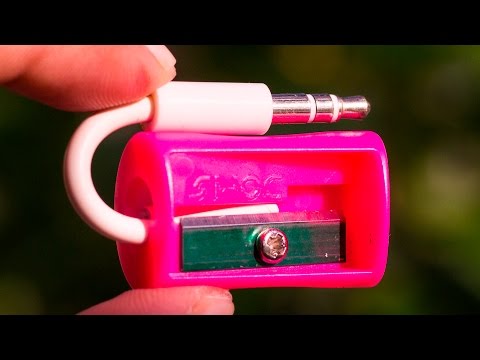
I don't find a knife. so I amusing this sharpener blade to cut this thing open.
Instead of three we have total 4 wires
Red, green, red-green and golden.
This red is for right channel and this green is for left channel.
And this red-green and golden this both two are ground.
And most tricky part is to solder on this wire.
If you see those wire closely you will find there is some kind of fiber thread inside them.
So it is really hard to put some solder on this kind of wire.
you need to put some flax. Over those wires.
Put soldering tin over any metal surface
And then
hold those wires inside the hot liquid tin for couple of seconds
As you see guys we successfully able to put some solder over this wire.
And we need to do this same with for all of those wires.
As you see guys I able to put solder on all of this four wires.
And if you guys are wondering what kind of soldering iron I am using.
I am using a 75 watt soldering iron from solderon
If you guys have different color coding than mine
May be you have a blue color; may be you have a brown color.
And you don't get it which one is ground and which one is positive.
So what you can do,
You can
Take any wire from here
and any wire from this side
and join them together.
And then this will become ground wire.
This jack called 3.5 mm T-R-S audio jack.
T for tip, this R, R for ring, and this S, S for sleeve.
This sleeve is the ground. You need to solder the ground here.
This is the ring
this for right channel
And this one is tip
it is for the left channel
You need to clean up the old solder before doing any reordering.
Next you need 3mm and 6mm heat shrink tube.
Join those ground wires together.
You can use gas lighter or any kind of heat to shrink this heat shrink tube.
Soldering the ground wire here.
Soldering the right channel wire.
Soldering left channel wire here.
Gently insert the heat shrink.
This one is 10mm heat shrink
Finally, it done. It's really hard and it not going to peel off.
Its really really yaaah... strong
Now time to test it
♪music♪
Right earpiece
working.
Left
working.
Hey guy's thanks for watching hope you like this video.
If you like it make sure you smack big thumbs up
And don't for get to click on a notification icon.
And if you have any question any suggestion.
Make sure you comment in the comment section below.
And meet with you on my next video.
Till then ta ta bye bye and peace
 For more infomation >> One of the most powerful power plants in the world in Vietnam with hands is yes - Duration: 5:33.
 For more infomation >> Stroke When Get Out This Root Can Cure End-Stage Cancer Only After 48 Hours of Use - Duration: 15:31.
  For more infomation >> Hot Wheels® Speed Winders
 For more infomation >> Hướng dẫn ảo thuật bài đơn giản Phần 2 | Học ảo thuật miễn phí - Duration: 5:23.
  For more infomation >> Mercedes-Benz CLK-Klasse Cabrio CLK-klasse Cabrio 230 K. Elegance - Duration: 1:01.
  For more infomation >> Mercedes-Benz E-Klasse Mercedes-Benz E-klasse 200 K. - Duration: 1:02.
No comments:
Post a Comment