Stock links are in the description!
Head up to File > New.
Width: 1280 | Height: 720
Change the background contents to an off black.
Color Code: 070707
Then hit OK.
Then hit create.
Head up to File > Open.
I'm going to add a metal texture.
Using your Move Tool. (V) drag and drop onto our project.
I'm going to rename this layer to Texture.
Change the Blending Mode > Overlay.
Drop the opacity to about 80%.
Select the Horizontal Type Tool.
The font I'm using is Code Light.
Size about 278pt.
Change the font color to white.
Then hit OK.
I'm going to type flames.
Head over and select the Move Tool. (V)
Center the text.
Right click on our text layer > Create Work Path.
Then head down and create a new layer.
I will rename this layer to Flames.
Hide our text layer.
Then head up to Filter > Render > Flame.
You'll get a warning message if longer then 3000 pixels. Hit OK.
Flame Type: 2. Multiple Flames Along Path.
Length: 60
Width: 20
Interval: 28
Change the Quality to High.
Click on the Advanced Tab.
Turbulent: 70
Jag : 90
Opacity: 25
Arrangement: 3.2
Then hit OK.
This may take a few moments. Depending on your PC.
Head up to File > Open.
Double click on a flame to load into Photoshop.
Head over and select the Move Tool. (V)
Drag and drop onto our project.
Drag it below the Flames layer.
Change the Blending Mode > Screen.
I'm going to rename this layer to Flame 1.
Right click > Convert to Smart Object.
Head down and create a new group.
Click and drag Flame 1 into the new group.
CTRL + T to select the flame.
Hold ALT + SHIFT while resizing.
Hit enter to accept changes.
Duplicate the flame > CTRL + J.
CTRL + T to select the flame.
Hold ALT + SHIFT while resizing.
Rotate as needed.
Hit enter to accept changes.
CTRL + J to duplicate the flame layer.
Continue adding flames throughout the entire text.
I will speed this part up, to save you time.
Take your time.
Once you're done, close our group. (Drop down arrow)
Select the top layer.
Head down to FX > Blending Options.
Head over and select Inner Glow.
Blend Mode: Hard Light
Opacity: 100%.
Select an orange color. Code: ff5a00.
Then hit OK.
Keep the size about 2px.
Then hit OK.
Head down and create a new layer.
Bring it below our group.
I will rename this layer > Clouds.
Head up to Edit > Fill.
Contents: Black. Then hit OK.
Foreground black, Background white. (D)
Then head up to Filter > Render > Clouds.
Change the Blending Mode > Screen.
Head down to FX > Blending Options.
Hold ALT + Drag the slider all the way to right.
Then hit OK.
Hold ALT + Mask.
Your mask should be black.
Make sure your foreground is white.
Have the Brush Tool selected (B)
Select a large brush with soft edges.
Start re-adding the clouds back.
Drop the opacity to about 10-15%.
Have the top layer selected.
Head down and create a new layer.
Bring it below the Group.
I will rename this background light.
Hold i + click on an orange color to sample it.
Head over and select the Brush Tool. (B)
Add a bit of light like so.
Change the Blending Mode > Screen.
Drop the opacity to about 10%.
That's starting to look pretty good.
I'm going to add some particles.
Head up to File > Open.
Double click on the particles to open.
Using your Move Tool (V). Drag and drop onto our project.
Head down to FX > Blending Options.
Hold ALT + Drag the slider all the way to the right.
Then hit OK.
This will eliminate the black in the particle image.
CTRL + SHIFT + ALT + E (Merge all visible layers)
I'm going to go ahead and rename this to Sharpen.
Head up to Filter > Sharpen > Smart Sharpen.
Amount: 59% | Radius: 1.0px | Reduce noise 10%.
Then hit OK.
CTRL + SHIFT + ALT + E (Merge all visible layers)
I'm going to rename this layer to Blur.
Head up to Filter > Blur Gallery > Tilt Shift.
I want to mainly blur the top and bottom.
Drag the guides up to blur the top.
Drag the bottom guides down to blur the bottom.
Blur: 15px. Then hit OK.
Thanks so much for watching!

 For more infomation >> TV3 se supera: humilla a los manifestantes, pasa del 155 y habla de guerra - Duration: 3:55.
  For more infomation >> YouTube TV Now Available
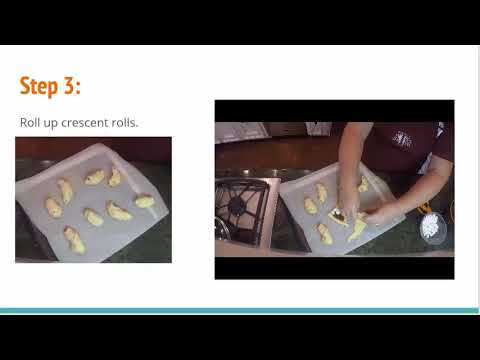 For more infomation >> How to mke S'mores - Duration: 3:29.
  For more infomation >> Patrick Sébastien : Il clashe On n'est pas couché et Laurent Ruquier ! - Duration: 1:52.
 For more infomation >> 股市操盤SOP實戰技巧研究院 ~ 葛蘭碧指標 $$$$ 如何精準抓住個股的轉折 - 20171030 - Duration: 12:11.
  For more infomation >> A L O N E - Duration: 0:23.
 For more infomation >> J'arrête de tout lui interdire, je le responsabilise ! - Duration: 3:33.
  For more infomation >> 10 mauvaises habitudes que vous feriez mieux de laisser tomber quand vous avez vos règles - Duration: 6:10.
  For more infomation >> Sarah kopiert Baby-Namen: Ist Melli Müller zu Recht sauer? - Duration: 2:06.
  For more infomation >> Vous courez le risque d'avoir un cancer du sein... - Duration: 6:14.
  For more infomation >> Une maman est forcée d'enterrer son fils de 4 ans 5 ans plus tard, elle fait un rêve qui change tout - Duration: 5:20.
 For more infomation >> "자나깨나 엄마걱정".. '나의 외사친' 이수근의 잘키운 아들둘[종합] - Duration: 2:53.
 For more infomation >> Inscrições para o 'The Voice Kids' 2019 já estão abertas - Duration: 0:58.
  For more infomation >> Sábado, 28: saiba a importância de prevenir o câncer de mama mesmo fora dos grupos de risco - Duration: 1:17.
  For more infomation >> ЦИТРУЛЛИН ИЛИ АРГИНИН ЧТО ЛУЧШЕ. Где купить цитрулин. Как принимать цитруллин малат. РЕАЛЬНАЯ КОЧКА. - Duration: 3:00.
No comments:
Post a Comment