How's it going everybody, my name is Conor Nickerson I'm the photographer, who
went back in time to hang out with his childhood self in the photo series i called
Childhood that came out last October. Before i start this video i want to say thank you so much to everybody
Who, enjoyed the project, who shared it and who commented on it all of your kind words really meant a lot
to, me and he was really amazing to see how, the [project] took off after sharing it and
Those months of working on the project
Paid off so thank you so much that was really incredible so what i want to do today is give you
Kind of a walkthrough of how, i went about
Making this photo series and the way that i'm going to be doing that is actually, by, making a
12th photo for the photo series and i'm going to be doing that right here in my apartment in montreal in my kitchen
Whether you were a fan of project and you just want to see what
Went into, making it or if you're a photographer yourself
And you'd like to get into this kind of thing then i hope you're able to take something away, from this video
Because this project really, was built on youtube tutorials i wouldn't have been able to do this without
Youtube tutorials so this is kind of my, way of hopefully paying it forward
And hopefully you're able to take something from this video so in this i hope to be answering
Some questions that maybe you had you know, which tools that i use?
How i went about, making the new, photographs look, like old film and maybe answer some other questions that you didn't know
You, had like other americans such as myself or people who just don't live in canada, who want to know
Do canadians really say "eh"?
so yeah i hope you enjoyed this video it's, my first tutorial so i hope i do a, good, job
If you, decide you enjoyed this video and you'd like to support me you can, buy
Me a coffee right here (just kidding YouTube discontinued on screen annotations) and the link will, also be down in the description
Otherwise i hope you enjoy this video so here's the photo that i decided to go with
This is a photo of my older brother and i in
2001 i was probably three or four years old we're sitting at the kitchen table wearing aprons and a
paper chef's hat on my, brother and
We must have been helping, my mother cooked, some cookies or something like that
One of the things i liked about this photograph that made it a
Good candidate for this project and for this video is that the background is very oldit's very
it's very
2001 there were some photographs and i looked at for this project, where the framing, was good to be putting a
Big version of myself in but the background
Would just be a field so it almost could have been that i photoshopped
Little me into a photo of big me so i wanted the photo to really have the atmosphere of the early
2000s so there are a lot of things that, make this photo look, like it was taken in 2001
Namely the calendar that says
2001 in the background but, also just the kind of sickly pink cabinets that
We used to have in our kitchen
And some of the amenities the if the refrigerator looks
Pretty old and the cooking products on the table the packaging is a bit dated so i think this is gonna be a good photo
And i can, also, utilize the space that, my brother is in to make the framing look nice i think that'll be good
So now, what i'm gonna, do, is i'm gonna take a lot of different photos because i don't
Want to have to go, back and do this again
So in doing this there are a couple things to pay attention to first of all
Is that in the original photograph there's a really contrasted flash behind us so that tells
Me that it was shot with probably a point-and-shoot camera with a direct flash, so i'm trying to mimic that by pointing a
Flash, directly at myself when i take these, another thing, is that you, want to pay attention to the angle that the person
Was standing at that's really important for when they took the photograph and this was probably taken, by my mother i know, about how
Tall she is and she was probably leaning over a little bit to get more on a level but you can, tell
By the countertops and the table that this photograph, was taken, while standing up
My, storage actually ran out while i was making the time lapse for this so here are the the photographs without the time last video
So i have all my photos here
that i took in my kitchen and
I'm gonna look, through them and see which one i like better
Which one i think is going to fit better within the photo, so i'm here in photoshop, and i'm about to open
some of the raw, files that i took
Shooting in raw isn't totally necessary
But it's nice to be able to have a bit control in the beginning over the colors
That way you can kind of get it on?
Clothes before it even comes in a photoshop so i was liking what i was doing with my hands in this one?
But it's a bit out of focus so i think i'm gonna look at. Some of the other ones
So i'm making a, strange phase in this one don't think i'm going to use that
one's a bit better a little out of focus on this one
i'd focus on this one i
Think, this one could work this one's in focus
Kind of looks like a face i would make if someone, was like if someone was taking my picture
while i was cooking with a younger version of myself, that's just too blurry so i think i'm gonna go this one
So i don't, want to do is bring down the exposure a bit it's a little too overexposed
Reference the i have the original photo here
It's going to kind of check for exposure levels if this was a photograph that was
Extremely overexposed if it was a bright flash that was used
In the original photograph i'd want to kind of
and
Throttle the exposure like that but it seems like it's for the most part
Decent exposure maybe just a little bit overexposed on the highlights
So i want to keep it about the same maybe up the contrast
these old film photographs, had really i
Don't know exactly how. You would describe it but the darks in these old film photographs like around
Here it's still kind of faded it's almost like a. Gray color
So i want to bring up
the black, maybe just a little bit i
want to do it too much like that and
that's also something i can, address in
With levels later
With levels and tone curve i don't think i really need to change it all that much
Okay, so let's put it in photoshop
So for this i don't think it makes a totally, big difference with how it looks
Because it's eventually just going into this this photograph here so i just
Used the first option alright so here's my photograph me sitting in my kitchen trying to look, like, this photograph
Could be something candid that i was cooking with, little, me and someone said, they were gonna take a picture
So i try not to be overly you know
Fake, smile or anything kind of just like i were to have looked up from doing this
So i'm gonna go over here, and i'm gonna click the quick selection tool, and
I'm going to just do my best in getting
All around
me
Going, to try to select, me it would be probably substantially easier if i had a solid surface behind
Me like a green screen, or something but for my
Purposes i've just been doing it in whatever environment i could because i was interested more in the light rather than
You know the background
So i'm just going a rough outline here and i'll go in for the
main the tiny details
afterwards
Sometimes i can, run into problems where it thinks that uh it needs to select. A, whole bunch of stuff that it doesn't
So you just do your best or you get a green screen
All right so since there's a lot of contrast with the blue, jeans and the floor it's being pretty simple to
cut myself out here
Now it was a bit different when i was doing?
photographs that involve chairs for instance the one
Photograph in the series, where i'm sitting in my kitchen
And the photos really overexposed
That one i incorporated the chair that i was sitting in and incidentally
that
Chair, that i used as a prop for the new, one?
Was the same exact chair
that i was
sitting in in the original one
So for this one thankfully i'll. Be behind the table so, we won't have to include
that
So, now i'm just gonna go around my head
Make, some small adjustments
it's better to have more
So for instance around, my hair it'd be better maybe to have a bit more of the wall
Then to cut into, my hair because when it's in the other document
In the other project then you can always cut, off more but it's
You're, not going to want to go back to look for little bits of the
Photograph in here that you left down, so i'm just gonna grow around the edge make, sure everything's all right
you
So that looks good i think
That's more or less within the frame
Within the selection, so i'm just going to take a moment to
Go, back to here
So this is my original photograph, and what what i want to do first is photoshop?
My, brother out of the photograph, so i'm actually taking my brother
From this memory, which is a?
An interesting way to start a project, about your childhood
So i'm going to use a quick selection tool, again
It's probably, going to be about hard, because this hat that he's wearing, this paper chef's hat
Is white so it's picking up a little bit of the refrigerator, also
So i'm gonna have to do my best
and
I think, what i'll do is leave that shadow out of this auction for now i'll select part of the shadow
I'll do my best just like the shadow. Actually and i'll leave that little bit in afterwards
Or rather i'll leave that and i'll leave that little part in so that i can, work on it later
i
Want to be sure that i keep in the shadow. From this
this
This, little, bowl right here
so that's going to be important anything that isn't my, brother here i
want to leave in
So even this little bit right here i want to save as much as i can
Because right, now i'm not sure how. Much of
Myself is going to be in this, and where i'll be located?
So it'll be nice to keep
Some not as much as i can in the photograph
you
Again all i grabbed his shadow here
And get as much as i can i'm kind of trying
Smooth out these edges and you don't have to worry, about them being perfectly round around the edges
Because we will be taking care of that with
The refine edge tool
So now it looks like i've just about
Gotten him and his little chef's hat
cool
okay
It's a bit hard to tell here, where the fridge
Ends in his hat begins but i got about there
It looks, about the same and it's not a. Huge, deal
So i would say it looks like, we have everything so now, what you want to do is go to the refine edge tool
And it looks like, we've just, about gotten everything there's a little bit here that was an extra that i didn't notice
sometimes
Sometimes the tool will will do that where it's likes a really thin, strip and then you can kind of see it
When you do refine, edge but that doesn't really matter so
What i did for the most part i found smart radius maybe about
It depends on what it is you're working on maybe about there?
Because if you go too far it it looks, like that, you'll be selecting way too much so you
Want to get it just good enough that
It's rounding the edges but it's, not making things, like, that unselected
So i'll do it about there and then i'll, add some smoothness
Which just kind of makes it less. Jagged and
Then a little bit of contrast as, well i think that looks good
And then on over i'd like to do, also is just shift the edge out
A little bit because sometimes it can, still leave in little corners
So i'm on windows so what i normally do next is hit delete but you can go up here to edit and just hit fill
And you get this
Box it says contents use content aware you're going to want to keep it on content to where and
Then for blending you can just keep it as is so what it does is it draws?
from around
That selection to basically erase
What, was just selected there?
So now, what i'm gonna do?
is take that selection out and
I'm going to take myself, now i'm gonna go back to this photograph
And take myself and i'm going to do the same thing with a refine edge tool
Smart radius put it on just a bit
And smooth the edge just a bit because it's a pretty alright selection there's nothing to
Do while that, we need to fix so that looks, good i'm going to hit, ok?
What i'm going to do, is hit control-c. You can, also go up here to edit copy, and
Then i'm going, to go here i'm going to do edit and
paste or ctrl v
it's asking, about the color profile, again, i'm just gonna choose the first, one
I think it'll look, fine if you, preserve
the color, appearance
And you can always, adjust it later so here is massive me in front of the photo of
Little me so what i'm gonna do now is go up to edit and
transform
And i'm gonna hit scale
You can, also do this, by ctrl t i'm really used to
Keyboard shortcuts so i almost can't even find
These shortcuts on the menu so
I'm just going to what i do is hold down shift when i'm dragging the corner that way it preserves the
Aspect ratio and it doesn't do this because i don't, want to be screwing up how i look
So i'm gonna drag myself in kind of like this
So now i have to kind of imagine that i'm actually in this photograph and
Thankfully, right right here there's already a. Chair that i can kind of use as reference
So i'm gonna look, and i'm gonna try, some different sizes, and i'm gonna see what looks realistic a
lot of this project, was
Taking a long time to just try a bunch of different things and see what works so in this case i really
Want to just make small, adjustments until i feel that it looks right i can already
Tell it's going, to be nice there's a window here in my kitchen and you can, see some of the light
Is kind of coming in looks as though the light is coming in from that window
There were some times where
When i was working on?
An image i would be looking at it i would say, okay that's a good size
And then i'd be halfway through the image and say you know
Actually that's i look, too big so i would need to adjust that, and there'd be a wuntch problem
Yeah, i think about out there
should be good
So, when you're done moving around
The transformation you're, gonna hit enter and that just places it on the canvas
So now what i want to do, is i'm gonna take the visibility off of this layer
And i'm gonna see where about, my brother, was cut out
Where all this funky stuff is happening in here because the more of that that i can cover up the better and the less that
i have to work on
Making look, normal
so i
Would like to position myself maybe right, about here that, way i'm covering up quite a
Fair bit and my legs will be hidden by this table
so i don't have to worry, about making it look like i'm sitting in the chair so now, what i'm gonna do is
go, down here and
I'm gonna, click on add layer mask
So this way i'll be able to take out parts of this image here and i won't have to worry about
Destroying the photograph i won't have to be worrying
About actually erasing it because if i want to bring it back it'll still be there and i'll show
You, what i mean so with our layer mask now, what we can, do is we go over to the brush tool
Which is b on windows and?
Then over here you'll see black, and white or you should see black and white?
If they're, not you can
Select, each one and then you just go to the top, left corner or?
Ffffff and then 6 zeroes
for black
so
To invert those
you just hit x and
Then if you, want to do it manually here
Can hit this little switch button
But i like to use shortcuts
So when you flip it so that the black is on top of the white and?
you, use your brush tool here and
You, use you can, change the size of it up here by clicking on clicking on the brush tool
changing, the size and the hardness i
Like to use alt and right click and then moving, my cursor left to right to change the
sighs up and down to change the hardness
When i'm doing this i don't, want it to be too much like that
Unless something calls for it because then it looks, like, this you start to erase yourself and it's really
Really unclear lines and
Alternatively if it's too sharp it looks like that and you get these kind of like bumpy looking edges
So, what i like to do is?
Do something a little bit not quite there
well maybe about right there and
What i'm gonna do is?
Come over here to the opacity of this layer, and i'm gonna, bring it down to about you know, about there
30% that way i can see the table behind me and
There's a couple, ways you can do this you can just use the brush itself
And outline all the stuff here or you could actually just go into
The background layer
So what i'm gonna, do and i think this will. Be easier i'm gonna go over back to the quick selection tool here and
I'm actually going to select
The table and these bags and bowls that are out here on the table
So i'm going to go ahead and select these
I'm gonna leave out this little bit here because i believe that, was part of?
My, brother's arm or something
This is a bit tricky because this is what was generated when i deleted my brother
From my childhood memory
So you, want to make sure that you're getting
What's part of the actual photo so this is the actual photo this part isn't that's not the actual bag of flour and?
if you, uh if you, can't tell, what's, what you can, always go back and
open the original file
To, reference it oops
So i don't think i'll need all the way over here i don't get it anyways?
So, now i'll go back into my
Me big me layer and i put myself back on here for the visibility, and i'm gonna click on the layer, mask itself
So then without changing anything here, actually i'll hit refine edge
Same thing bit of a smart radius
Bit smooth
contrast and you can, eyeball this to figure out, what's going to be
it's going to be better or not so then, what i'm gonna do is
Hit v or go to the brush, tool, here i'm going to make sure that the black
Box is over the white box, and then i'm just gonna color over this making sure to get
Every every part of the photo it looks like i missed a bit here
So all i have to do is x out of the selection
Go, back to the brush, and then just take that out so
i'm gonna, go through here a little bit and
I'm just going to make sure
That i didn't mess anything?
Just, want to make sure that i got around the, bowl because a little bit too much i think got included
And i think that'll be good now it looks like i've erased part of my hand here so when i bring the opacity
back it looks, like i've chopped, off my finger and
The measuring cup is coming through the arm of my
Younger self so all i have to do now is go to the brush hit x or this little switch button
so that the white one is on top of the
The, white box is on top of the black, box and i just draw. Myself back in and since i
since i already
Made the selection i don't have to worry
About getting
Any of the background of this photo in because the only thing that i have here
Is my hands so there's not going to be like, wall in the background
So, now i've run into a bit of a problem
Because i've got my arm here
Comes out like that
But the bag of sugars in the way so?
This is a similar kind of problem to what i was faced with when i was working on this project?
So i'm going to lower the opacity and see what i can, do?
So i think, what i'll try is having, my hand be over this, bowl here and behind this bag of sugar
So let's try it out
So i'm going to lower the opacity, so that i can kind of see both
so, yeah, what i'm gonna do now, is i'm going to go back over here and
Switch it back to
Black being on top so it's
I'm taking parts out. And i'm just, going to kind of color this on?
I'm just going to do a rough outline here
And then i'll get along the edges and
Again, this is the line, where the bag actually, was so that's what i want again?
You, get this little fold here
the thing, about this project, to make it look, realistic it's it's really all in details there can't be
There can't be any or many signs that this is a photoshop project it has to look you know
As convincing as possible so that means getting in really close
With all the little details so let's see how. That looks
That looks a bit more natural i think that
could be
could be possible
So when i have a problem like, this i just kind of take a, step back so
I think this looks, more like i'm just kind of reaching over the
Bowl than anything
You know i think, what i'll do is just take out the bowl
And that way, it won't look, awkward, because right now it looks like, my hand is going right through the bowl
But i want it to look, like that so
That should be an easy fix
So over here what i'm gonna do?
Is i'm gonna take, my brush i'm gonna reverse it so i'm painting on
This layer instead of taking it off and i'm just gonna go around the edge of
This, sugar, bag
Basically taking out this bowl
And will tend to the rest of it later because there's a bit more we'll have to take out
one thing i like to use is
you hold down shift on
Windows and you click?
After you've made a point so if i make a point right here and i hold down shift and click it does a straight line
For me so that's that's convenient
So that's looking, okay, so what i've got going on here is i actually have a part of the
Ye old photo, so i'm actually going to take this, whole thing out i didn't realize that
So for this line here i want this to be authentic i wanted to be kind of like
jagged like it is
So i'm going, to take that technique that i just mentioned
I'm going to paint myself whoops
Paint myself out of the edge of this table in a straight line, so i'll, make it click here whoops
Hit next, make it click here then hold down shift and then find a point you, want to get to and
then
Like, i think i'll do this a couple times
Just, because i'd like to have this as good as possible
So i'm getting myself right on the edge of the table here and then i'm making a, straight line, right up
Now, that was a bit too far so i mean undo that
And try this a couple different times
And again there's a lot of going, back and saying, okay, what's off and then going back to the things you might have overlooked before
so now, what i'm going to do is address this, bowl, and
I'm going to address all this stuff back here, by in my head
So to, do that i'm going to take myself out, again. By taking off the
opacity here and
Then i'm gonna, go to the background right here i'm gonna turn on and off the opacity on myself
to
Just check how, like because i don't need
this, whole top of the, bowl here i
Can just take out this bottom part and not have to worry, about that because that'll be covered anyways
So i'm going to take off the opacity here, and i'm gonna, want to get at least, this portion so the way
That i'll do that and a big part of this photoshop project. Is using the healing brush tool, and the spot healing. Brush tool
Since i know that this is going to be a bit tricky i mean use the healing brush tool, which allows
Me to reference a specific point in the photo to cover this up
So i'm just going to start by
Using a piece here so to select, my source
I'm going to want to go to the healing brush tool, not the spot healing
Brush, tool, but the healing brush tool and go down here to the corner
Where the table is and i'm gonna hold down alt and click and then that's going
To, give me the ability, to put that little bit of the table anywhere that i want and when you draw with that tool
it actually
paints
An image of what was around that selection so for instance if i selected this real quick and?
I, want to put that over here i could just put the head
Like that and it kind of automatically blends it with the sugar, bag or i could
Circle the whole thing and get the whole painting and eventually just the entire image
So what i'm going to want to do, is select here in this corner and thankfully it's just kind of a pink texture
i like to keep it on
Replace up here in the mode
Because normal tries to blend it with, what's behind it and we just want to replace?
Something exactly sometimes you, want to use normal mode but i like using replace more times than not
so we're gonna go over here and
We're, gonna get the table, so we're just gonna click
Draw up until, we see something that, we don't need?
which in this case, would be
once it starts painting on
The the, bowl here so what we're, gonna, do the same thing over here
Paint upwards and now we've pretty much gotten rid of the bowl there
Sometimes this looks pretty vague here
But sometimes you can really tell that it's a copied pattern so you, want to be careful with, how
You, do that i mean i'm gonna, do the same thing with, my arm here i know i just need a little bit
so i'm just gonna put a little bit in
You can just kind of brush it on
And that looks pretty all right
So, now i'm gonna, bring this layer back and it looks like i've for the most part
Got what i need, to so i need to paint a bit more in here
and that looks alright i
Think i'll just paint, along the edge of the table to
cool
So one thing you have to do as, well is remind yourself that people
Won't be looking at it this close up so you can just kind of zoom out and say okay looks good
So now i want to address
All of this that's going on behind my head
Wait i'm going to do that is pretty much the same method
So i want to check to make sure i don't do more work than i have to so just about this
Whole area here doesn't need to be done so
i really just need the edges here and
Maybe the top of the edge of this calendar so how am i gonna do that
Pretty much the same way
i'm just gonna go in and
Make, a little selection here with, the
Healing, brush tool, and hit alt to get my source and then i'm just gonna draw up, want to make sure it's not replace
Use the reference point up here
And that looks, about right so i want to get this area up here this, whole bit to do that
It's going to be a little bit tricky
but
We'll make it work?
So i'm going to take the
healing, brush tool, again, and
I'm going to take this little
line right here from the bottom of the calendar and
Make it like that
Get the whole line across
Make, sure it's a straight line
There's still some stuff, some funky stuff going on
Up at the top, but you know, what we're? Going to take you out so
you're, gonna, do the same thing for the rest of this photo essentially i'm going to take green from over here and
recreate
This part maybe take, some from over here
Just kind of dab it on like that from far, away
It's not quite so noticeable
But you can, do some things this is where it can be useful to use the
Really, faded, brush
Gonna, put some random light green parts around here
See how, that looks yeah
Looks, okay?
I'm not sure how, about this yet so
One thing i, also, want to do is make this a fall. Calendar, so i'm going to just take
These look, like arms that i'm distorting
Okay, so i'm going to make the arms go down, like arms do typically
Now it looks a bit weird
Can't tell how, i feel about that
maybe
i'll start by filling in
This red shirt here
So i'm just taking, some random points from the rest of the calendar
I'm actually just going to keep it like that
so
Now that we have that mostly sorted out i'm going to kind of solve this
Weird stuff that's happening around here and this should be pretty easy, what
Because i'm just going to be selecting they go all parts of the fridge since the fridge is just a
big texture
It's nothing very definitive it won't look too, weird so i can do this and that looks great
If i wanted to i could really take out
This, whole portion but i don't need to
Okay, so now i'm going to do the same thing down here
Actually i'm going to select from psych the source from over here because this is about the same lighting as right across from the
handlebars
It's not going to look too strange
Make it a bit of a
harder selection a harder brush
and
yeah, looking good
Quilt so now, that's alright
And add a bit more of this right here into here
Because i didn't quite get it all the way
I'm gonna fill in this area
Because that way you won't see the blend
The contrast between this white and this white even though it's subtly different you can
Still kind of see a difference so i'll keep it like that and that looks good
so
Now, what do we do?
so
When i get to this kind of stage where i solve a couple errors just kind of zoom out zoom out
And see what catches, my, eye so one thing obviously, is that the quality of this is a lot
Higher than the rest of the photo there are, some exposure issues
And some tint issues but i'm gonna go around to photograph and see if there's anything i can work on
One thing that i did notice, is that i have especially around here really subtle
Edge issues you can, really see like the
edge of my
Hand my hand is kind of outlined by the wall that was behind me?
So i want to get rid of that so now, what i'm gonna do is come over here i'm gonna hit ctrl + shift +
Click on the layer here and that'll select, my layer
Then i'm going to go, back into refine edge
and i'm just going to bring in the shift edge a little bit so i'm gonna, bring it i
Don't want to do it too far like, like this
Just gonna do it a little bit and see how that that helps
Looks, like i'll be taking off just about what i want you maybe just a bit more
Okay, and so instead of erasing this using the eraser tool i'm just gonna go over to my layer
Mask, and hit b for brush make
sure the black is on top of the white square what i want to make sure to do is
Invert my selection so you go up to select and then
universe
Control shift i and then that selects everything around, me and then i'm just gonna paint that
cool
Now i should have a bit less at least of an outline and i do?
Look, around just one more time
see if there's anything i can clean up i think i can i
Think if i make, some minor adjustments here
Kind of soften up the edges?
It'll look just a bit more realistic
In fact i'm going to do that selection, again, get refine edge
And i'm just going to put a little bit of feather
Same thing inverse and then paint around
Cool i mean that was a really subtle change it's not totally necessary
Now i'm going to address, some issues
With the color, and with the exposure, so i'm going to come over here and i think the first
Thing i'll do is lower the exposure
so i'm going to add an exposure layer which is up here i'm going to right-click on it and
I'm going to click create clipping, mask, this, way
The exposure is adjusted on just me and not the whole rest of the image if you don't have the
Clipping, mask
Then it's going to do this
It's going to affect. Your whole photo
So you, want to add exposure
And add a clipping mask, so i'm going to lower the exposure just a little bit
And i'll leave it around
Now, because i'm gonna, want to make a couple other? Adjustments i'm going to add selective color
And i'm gonna play around a bit with these, and i'm gonna try and match
Want to add clipping, mask you can, also add a clipping mask
By dragging it beneath a layer that has a clipping mask on now you see both of these have a narrow
I didn't adequately in clipping, mask at first you'll know as soon as you?
Start editing
So i think i'm going to add a bit more red
like that
Yellow, because that this have a very like purple
Faded kind of look, going on and the darker tones over here do that
Take, black down a little bit give it a bit of that faded kind of appearance
Next what i want to, do i'm going to add a saturation because this is like pretty saturated and take the saturation down
Okay, looks all right leave it like that for now
I'll make it minus one okay you go back in a selective color you
So i'm using, some reference points mainly
These two colors but, also the color of my lips
Because these are very faded
These are actually a bit more pink
then in the original i'm
Going to address that
A bit better
Kind of really, wash the collar out
It's a bit more accurate now
okay, i think what i'm gonna do now is
I'm gonna, make this color match this color, so what i'm going to do this is just kind of a. Superficial thing just a
Extra thing that isn't totally necessary, but i'm into it
Going, to select just the shirt
you, you
So i have this shirt selected gonna refine edge
Okay, now that i have the selected i'm going to add a color layer, so i'm going to do solid color
Going to select
The hue of this apron over here
and i kind of adjust it as i need to and
Then i'm gonna change
The blending type, so i'm going to change it to overlay see if that works
Usually, overlay or soft light
Are the most helpful
So i'm basically just going to adjust this until looks
close
you
you
and i'm going to fill in some spots that i
Missed so i think that looks all right
Now, what i want to do, is i'm gonna kind of add that faded look?
that you see with film and the way that i'm going to, do that i'm going to go to color curves or curves
And i'm going to take this arrow
Down to this little dot down here i'm just gonna kind of raise it up a little bit
Can't go too much because it's gonna start looking. Like, that you, want to make just like a subtle adjustment
like that
Might look, even a bit too much so i'll go back into selective color, and put my black back up
you
okay
So i think after a little bit of exposure adjustment. A little bit of
Curve adjustment and saturation this is looking a little bit better
might actually add a little sadder saturation, back in
Now, what do i want to do?
Now i want to match the aesthetic of this photograph?
to, this photograph
When you zoom into this one?
You, can't see as many pixels
you, can't see
It's not quite as, well you can't when you, do that it's not quite the same
This one looks a lot more dense a lot more sharp
And this one looks a
Like a higher quality image that, was kind of scaled down
So to counter that i'm going to go into here and take, my layer and i'm gonna
Add just a little bit of noise, so i'm gonna go into filter gallery, and
i'll go to texture and then grain i
Don't want it that intense, so i'm going to turn it way down
Going to zoom in maybe to just about there
Want to make sure the contrast looks just about the same as the original photograph
So, now i'm gonna go see how. That turned out so i turned out alright
One thing i also like to do is to blur
So i'll blur just a little bit and then
Go in to sharpen and hit sharpen and then that kind of gives like this false
False a sharp look i guess it's actually not too, bad as is?
it's already looking, okay, so i'm gonna leave it like that for now so i think that looks alright and
What i want to do next?
Is i'm going to add in a shadow. So
going, new
Actually, going to open the original photograph, and i'm going to look at, where the shadows fall for my
Brother here so it looks like the shadows go just about all the way off to the side
and even down here
Okay, so the next thing i want to do is add a shadow. And
the way that i'm going to do that is right click here on my layer and hit blending options i
Go, down here to draw. Drop shadow. And it's selected i'm going to
see how much of a
Before i do that i'm gonna check
What the shadow. Looks like in this so it's a pretty straight line there's not much feather to it
and it's pretty distant away, from from where my, brother is
So, when i go in here and i click on blending options
Go, down to drop shadow
click on it
It doesn't really matter so much how. You're editing it right now
Because we're, gonna be making it a separate layer so
See what the different blending options are here overlay is a bit too
Too, light so we can, try multiply
And turn down the opacity i think that looks all right right there so now. You'll go up to layer
Layer style and create layer and then you're just gonna hit ok on that
It's just telling you that some effects. Can't be recreated so now you have a, separate layer, that's just the shadow
You can move it around
Control-t i can, move that shadow. Around look at that so
The the shadow in the original
Falls down a bit we can, use a reference point like his ear so the top of is there here
and
The top of his ear in the shadow
Are at about a 45 degree angle
so
I'm going to use that
Reference of how far they are away in the angle that they are to
Figure out, where i'm going to put my new shadow. And i'm noticing right now that there's, also a shadow. From
The, bag of flour and the bag of sugar, so i'll have to remember that when i'm finishing this up
so now if i go back in here and i look at my, own ear i
Think it's a bit distant from me i think i'm going to bring it in a bit but that angle is looking, okay?
Zooming out say that looks alright
So now, what i'm going to do?
we're, going to take this out and
See what i don't need so essentially i don't need, any of the shadow. That falls on the left side of me here
So i'm just gonna go and create a layer, mask here
You know i take the i'm going to take the opacity
Off and hide this layer the layer of myself and i'm with the brush and hitting x to invert
The the colors here i'm gonna take out
Just some stuff here because i don't, want it falling
In parts of the photo where i don't need it
and if i put that back on
that's looking good
So the next step is to compare
The shadow, my brother's shadow here is very dark on the cabinets and then a lot lighter up on the fridge
i'm going to take down the opacity on this
In fact i'm going to go into the layer, mask click on the brush
I'm going to keep it on the dark
so i'm going to be taking off part of the shadow, and
I'm gonna, take the opacity of the brush itself down a lot i'm gonna take it broadly down to 30%
See how, that looks that
looks, okay i
Think i'll take it even less
And just kind of brush that on
The photo, again, here it's really dark, down here not as dark on the refrigerator
Maybe take a little bit of this off but that'll stay pretty dark
you
all right
So, yeah, about a month has passed since i said the word all right i
Was getting tired the night that i was working on that so i didn't?
Want to kind of drag anymore because i felt i was starting to drag a bit
But i also just kind of got caught up with school, and with, some photo assignments
and so i'm only getting back to it now but i did edit the video and kind of
Shorten it up as much as i could, and that took, some time as
Well so what i'm going to do first in returning to this
Is i'm going to address this bag of flour here so the edge
Is kind of feathery and i want it to be a bit clearer than that
Because it looks a bit unnatural right now and so the way that i'm going to do that
Is i'm going to come over to my layer one which is the photo of myself i'm going to turn down the opacity
mm over here and
I am just going to well first i want to see
Which part of it i need to take out or put in so i think i'll start by
Selecting the layer, mask hitting b for brush and then x and then all kind of just
making sure i have kind of a
Hard brush i'm going to just paint, along the side here
And turn it down to check, where i'm at
Okay, even go a little bit more
And put it back and see how. That looks i think that looks better
Can use this as a reference the way that
Objects. Like this
salt container here
look
So maybe i could, even go really hard with the with the brush, along the side like that
i'm actually missing i went a bit too far here so i'm gonna hit x and i'm gonna paint, myself back in
cool
That's a little bit better and i can, also reference the original photo, which i have here and it looks like, that's about
Correct. Yes can paint some of that back on?
Okay, and that's good for now?
So now what i want to do is add a shadow behind this because in the original photograph?
There's a shadow being cast here by the flash so the way that i'm going to do that, is i'm going to actually select i?
go, over to the quick select, tool here and
I'm going to just select, this bag of flour
Select the bag of flour best i can, it doesn't have to be absolutely perfect
So the important part is going to be just this side of the flower packet and honestly
Even just the top part here because there's already a shadow here
We don't have to take care of that so i'm going to go up to refine edge
Smart radius turn up the radius a little bit, well not that much
Maybe i could put a like a little bit of smart radius smooth yeah
And contrast and turn the contrast up until it looks good
Okay, that should be alright so now, what i'm going to do is hit copy, and paste so ctrl-c. And ctrl-v for windows i
believe that's command c and command v for
Mac and so i'm going, to put that, above the layer one which is myself
I'm actually, gonna i'm gonna have to put it up here because it's putting it out as a clipping, mask
Giving it a clipping, mask so now this
Bag of flour is a layer on top of the photo of myself so now, what i can do is i can, add a?
solid color layer
Yeah, okay, do i get beneath that bag of flour
So now you see there's only the bag of flour visible
And i'm gonna come over here and i'm going to hit new layer or layer, mask, sorry
So now, what i can do is i can paint this layer on hit b for brush can
Paint it on like that you see where i'm going with, this, so i'm going to
Go, to, soft light to start and i'm just gonna
I'm just going to trace, along the edge of the
Bag of flour, i want to see kind of how it looks here you can
Use this as a reference point so the corner of the flour, bag is here and the corner of the flour
Bag in the shadow. Is down here so it's kind of falling like, that, so i'm going to mimic that
I'll put a little reference spot here and then i can just kind of
Actually i'm gonna put it a little bit lower than that
probably right here and
Let's see what it does on the table yeah so it's actually a really thin
Really thin shadow here and then out here it comes out so i can, do the same thing right here
So, again i'm going to put the reference
The corner is going to be right about there
I'll take care of that little bit later and then
This is gonna come up like that
you could, also do this by creating a drop shadow on the
The, bag of flour i think if i just eyeball it it'll be all right
So, now i'm gonna fill in all this space here that i left out
for this i have my the opacity of my brush on 100
at 100%
that way i
Can change the opacity over on the side here so now, what i'm gonna
Do to get rid of this little bit i'm just gonna hit x to invert the colors over here i'm
Going to click a point, along the edge of
The table and then i'm going to click another point, like that holding shift
So i get a straight line, and that looks good so, now i'm going to take this color layer and lower the opacity
All the way, and then slowly, bring it back up until it looks, like it's a good shadow
and
Because on the shadow, here it's a bit more of a feathered
Edge it's not so straight i'm going to go into, my layer, mask you have to make sure you select the layer
Mask, over here and not the color itself
this, way you can paint on it
So you go over here and then
Holding, alt the right and left movement with the mouse and then you drag up
Get that softness and do right about there maybe
Just to soften up the edge a little bit
And i'm going to pass through a few times
you
and that's looking pretty good i think i think i like that looks a bit more natural now, and
What you could even do if you are, happy with how. That layer is
I don't think i'm gonna, want to move that at all
so if i go over here and
i right click and
click on rasterize layer
And then come up here
Go, back into the filter gallery
texture grain
Add maybe you know that amount of grain see what that looks, like it's a bit grainy now
gonna, add
blur
And that looks good now it looks
Less like a color layer and it looks a bit more like part of the photo you have
some of that green within it and i think i'm going to do the same thing with the rest of this photo of me
But first there's a couple things that i want to
take care of first of all i
Looking at this i don't like the exposure levels so i think i'm gonna come over here to the exposure
Zoom out so i have a kind of a gauge for what this looks like
And i'm gonna just play with the exposure a little bit
you
I think that looks a little bit better
But i still would like to maybe add some saturation to my face so
I'm going to do in order to do that
i'm going to
come over here and
click
hue/saturation
just going to turn it way up like that and
Then what i'm going to do is delete the layer, mask, again, come down, here hold alt and make a, new
Layer, mask so it's not affecting anything. And then just like the shadow i'm going to draw it on
And i'm just going to roughly draw it in on my face right now looks very strange
Wow i look like i got a, bad summer, okay, so i'm not
I'm not selecting i'm not doing this over my mouth like, that because i think it's going to be alright as it is
So, now i'm going to come over here to the hue/saturation i'm going, to put this back to where it was
And i'm just going to slowly increase it just going to increase it just a little bit maybe change the hue
Still look, like i'm just tanned which i don't, want it to look like
Just trying to get a bit of?
an effective
My skin looks in this photo, and i've noticed in some of the other photos that i was working on?
Skin takes on this really like
dense reddish
Look, to it so i had to adjust for that in some of the photos where i could reference it and say okay i can
tell that
This is how the skin was?
handled by the the film and
So i had to do my best to match that so now
See, what it looks like without
It's a subtle, adjustment but i think it's i think it's alright and i can again
Always go back to that and put on the brush, and i'm just gonna
Myself a little bit more color in my hands
Okay, since it's on jesseman i don't have, to be super specific
with how, i take care of that
okay, so the next thing i want to do for now is
Adjust this shirt, again, so let's see, where i'm at with this, so that's the color layer for the shirt
I'm just going to play around with the colors here for a sec
you
So that's actually not too, bad right there
It's a bit darker and more saturated so i think i'm going to
Hit a if i hit ctrl. And shift at the same time if i hold, them down and click on the layer, mask it selects
What is being affected here?
so
If i make a, new layer by clicking i do i want to work on here i think i'm going to go
to
Go, go - let me try curves i go to curves bring up this level
If it's just, about there that's alright because this is super faded super faded look
And i can kind of mimic that by going upwards like that
with the
With this little dot down here that's normally right in the corner
so now this is looking slightly, more purple so i think if i
bring in the color a little bit i can, make that look a bit more red i
Think, right there is pretty close to
This, this original apron, color, so that's looking alright
you seem
So one thing i want to work on now, is matching the grain
Because this is super grainy looking this is really dense you can see all the
All the little pixels and in this it's a little bit smoother
So i think i'll counter that
by trying to add some sharpness now there are probably, some different, ways that you could approach, this you could probably
Lower the the quality of the jpeg before you bring it into photoshop
When i was using for the project, was?
Pretty much this using a!
Sharpen, and blur i'm gonna hit sharpen see how. That looks that's already looking a bit better
This is already looking pretty
Speckle ii can kind of already see a bunch of the little dots but there's still a little bit more detail i think
overall
i'm going, to try something here i'm going to throw on a curves layer and
I'm going to bring, my, highlights down
and then in
you
And then bring the darks
like that
you
I think, that's already looking a little bit better
And compare how, this looks to this
There is a bit of shadow coming down here so i might even add in some shadow
Behind my hand right here so
what i think i'm going to try and do to get that to look a bit more like the original image quality is
I'm going, to try and sharpen it a little bit more see how. That works and hit blur first and then
sharpen
You just go a little bit farther i'm gonna hit sharpen, again
That's a bit too much definitely too much
so i think right there looks pretty, okay i
Think i can, live with that at least for now
One thing i want to get to
Is my hand here so one thing i'm noticing, is that
There are no shadows being cast on my hand in the original image but there are some shadows here
so i think i'm going to address that by coming to the layer one and
I'm going to take
The healing brush, tool i'm going, to put it on replace and i'm going to bring the brush size down
i'm going to select, my sample right here and i'm going to draw, some more in
So now there's a bit less of a shadow being cast there you can, do it under
Thing, like, that looks a bit strange i am going to redo that
and i really outline
The scoop
That looks a little bit better and it's a really small
Subtle adjustment
redo that
Yeah, and what i want to do over here is well i?
Think, i would like to
Take this sample here i'm gonna put it over there so now. There's a bit less
Bit less shadow. Maybe yeah that looks a bit better i think
So i'm noticing that there's really intense
Kind of lifts going on in the shadows here it's looking really faded and should
not look quite so bad
so i think i'm gonna come in here to the layer mask of the curves that i put in
that affects everything on this photo of me, and i'm just, going to take this part out and
I'm going to hit b for brush
And undo it i think because there's already, there's already, some curves going on right there i'm just going to take this out
And again, what i could even do is control shift
Select the curves there and then just go back into the layer, mask here and just draw it all out
So i think, that's looking. A little bit better because now it's not totally, washed out here
maybe you're, going to put in i think i'll take out a little bit of the curves i
have here
Take a little bit of it out here
Because this is looking a bit funky to me, so i'm gonna put the opacity of my, brush down to
25 that's good
Put up the softness and i'm just gonna kind of draw it out. A little bit
Just because the shadows are looking a bit too light and i don't want that
That's a bit better i mean actually going to, do the same with the shadows, within the shirt itself
Yeah, look at some a bit too, strange take those out
And put it down to seven percent see if that looks better
And i'm just gonna outline, these shadowy parts of my shirt
How does that look, i think that looks a little bit better
So what i think i'm going to do now is add in some of this shadow so as i did with this color layer
Here for the shadow, i'm just going to put in a color layer behind
me so i'm going to come down here so i can put it in between this shadow, and
This, photo, myself i'm gonna come out over i'm gonna hit solid color gonna just go to black
and i right-click just delete the layer mask, my, new hold alt and
hit a new layer i
Come over and i'm going, to draw it in right behind
my, hand i put the opacity back up on the brush and
Wow it's pretty intense, so i'm gonna put it over on?
soft light and
We're just gonna see
what i can, do i
put a bit of feather on
And see how that looks
Now i'm noticing that the the shadow on the refrigerator has this really
Like reddish brown kind of tint almost like an orange so i think i'm going to
Change the color here see if i can, make it look like that
To get a more intense color i'm going to try overlay
and
Going, to try from that up here
Blending layers see what's going to work better
It looks, like it's a around there
i think if i use, vivid light
hmm
Yeah, that looks about right
Make it a bit of a smaller shadow. I hit x make it a. Bit smaller i get a bit more subtle
You're, gonna, want to if you, do something like this it is always this kind of desire to like
Almost overcompensate and say like, okay i really need to just need shadows
So i'm gonna put in some shadows it's going to look real you got to be like
sometimes you just
Something that as small as this can can add to making it look
Realistic so this looks a bit denser than than this one so i think
I'm gonna turn down the opacity just a bit that looks great
amazing i
love it okay
And it changed, where the shadow
Is i'm gonna actually put in a little bit more and take a little bit off the side here that
Would be even better?
okay
So the next thing i want to do is address the way that i'm cropped because i think
The way that i'm cropped in this looks kind of unnatural so i'm going to try, going to the lair
just
Hitting x and taking off little bits whoops not that much
I'm just taking off a little bit from the top
Because but feathered here
it's quite a few pixels
between my head and
Not, my head that are kind of a
Gradient so i'm going, to try that this
you
Okay, so now uh i think there are, some more things that can be done
But i think now it's getting into the really
fine details
One thing, is that the exposure on my hand here and on the spoon seems to be a little bit high
So i'd like to
add in a new exposure level layer and
again
What i'm gonna do is?
To turn it down
Way down so i really can, see the difference when you delete the layer, mask
Create a, new layer mask come over here and i'm going to draw it on to the brush
And to, my hand just like that and now i'm going to return it to normal
The reason i'm doing this is because on my hand over?
Here you're, not getting those really bright
points and the spoon seems to be
Maybe a bit highly exposed, so i'm going to turn it down just a bit
I think that already looks better
Nice so one thing i also notice about this. Is that when this scanned it got a bunch of little
Little things, like this here
so
We're, going to recreate that
Respects everywhere on this on this photo and this this actually, also happened with the photo of me with
myself on the train
There were a lot of little specks in that one so to
Take care of this i'm going to come up here i'm going to add a solid color same thing we're going to delete the
Well delete the layer mask we're going to create a, new, layer mask hold down alt new layer mask is probably a
Quicker way to do that
Some kind of shortcut but i have not found it yet and nor have i've looked so it is
To, be discovered so i'm going to come over here to pick a, color i'm going to just go straight up white
and i'm going to come in and
Basically as small as i can
Just, make, some little dots
See how, that looks that's already kind of big i think i even want it to. Be that big it's almost like
half of a pixel that i want
So i think, what i'm going to do is come over and fix, my brush i think i'm going to change the brass brush
So i'm going to use this one right here
It's a really small small little brush, like, that i think if i make, some really small lines here
you
on the opacity some
A bit less intense
Use this one here as a reference so
I think if i stagger the the white lines can almost look a bit more like
Like a nashville better
you
Okay, so now i've abstractly kind of just added a bunch of dust
face
I, want to do now, is make it basically not look just like a color layer like, we did with, the shadow
so
Going, to do the same thing that i did before i'm going to zoom in on one of these to see how it's going to
affect it
I'm gonna put a little bit of noise
On this wow not what i wanted to do there?
See if it's possible to select
basically this election it's only, selecting me
The little things that i drew, so i'm going to put some
Noise in them
and
I'm gonna hit sharpen more
That really, makes them kind of stand out
Nice look how. That looks, okay, so now, what i want to do is?
Lighten up, this area right here because it looks a bit too light
I mean it come over here to the curves layer
I'm going to select, my brush
Make, sure the black is on top over here to keep the opacity down
Probably around 20%
And i'm just going to
Brush, over this just a little bit i'm sorry
Yeah, i'd like to take this off
That's re, for now so the other thing that i noticed?
Is that is that the?
Shadow here is more of like this shadow, and it's not actually dark, like that
in the original image
It's more of a peach kind of color
Which is the same as the one that put it over here so what i'm going to do
Is i'm going to come over to
My, layer that is the shadow i mean a hit ctrl shift hold it down, and then select on the layer mask
And i'm going to come up to this layer, which i can, see is my little shadow, layer down here
and i'm just going to fill that in
Now right now is showing up very dark, i think that's just because there's already a shadow
So i only need to get down to
About where it goes to the cabinets and i can stop so right, about here is alright and
Then i'm going to actually go into the
Layer for the shadow, now hit x so that my brush is inverted and i'm going to take that off
Now i need, to do some manipulating here
So it's still looking kinda, wonky right now it's not quite as light as it was in this one here
So to fix this i'm actually going to
take, my, brush and
I'm going to little, by little take parts of it off, so i'm going, to put the brush down to 15%
invert the brush and
I'm just gonna start taking little bits off
That's already looking better let's see how it looks compared to this
not bad i
Think i'll even take it down just a bit more
take off that
corner here
Go, look, a bit more natural like that
that's looking pretty good
i'm just gonna keep cross-referencing the two photographs
to, see if
There's anything i can, do to make it look, better
i'm even going to
Go, back into
this
Layer the drop, shadow, the original black drop shadow. And i'm just going to add in just a little bit
That's already, too much so i'm gonna put the opacity down to 4%
And i'm just gonna brush a little bit on just so i get that darker look
and that's looking pretty good
Nice okay, so that looks a lot more a
Lot more convincing as a shadow i think is this not just this
This, black, mass behind, my head it's actually the color of the rest of the shadows in this photograph
So now what i want to do is come down here and work a bit on?
This corner of the image because this corner of the image seems to be standing out a lot to me
So first thing i want to do is i left a bit of the chair in in this photograph so
I'm going to just go to layer, mask of that layer hit x so i'm inverting the
selection, and i'm just going to take out the part that looks like it is a chair, and
I'll see how, that looks
So this is part of the selection
that was i
Mean this this whole thing
So i'm going to go into the background, and i'm just going to clean that up using the healing brush tool, and
hitting replace
so i have to do is
Sample some of the cabinet around
and let that fill in
When i add that back in and that
Looks, better now there's already a
Shadow, here from the previous image
so i want to take that out because that's from this thing and
Obviously it's a different
There's something, else here so that's not actually
The shadow. And i'm also noticing that this has almost a brownish tint compared to this shadow here so
I'm going to first take this out and you use the same thing
content-aware
or
Healing, brush rather
I'm just going to fill this in i want to make sure it's on a replace because that's going to be more convincing
Actually just going to
the this
select this little thing here, and i'm just, gonna place that in
That looks alright to me
May, actually i'll take this one instead
Normal because i think think i'm going to need it more for this
you
Now it's better?
So now that that's taken care, of i'm going to address this part of the shadow
Because i think in the original image looks a bit more
Colored has a bit more color to it
Then then it does here
So i'll select, my
shadow, here ctrl shift select, and
going to
create a, new color
Going to make it a really dark, brown color to start with
I'll put it on overlay and?
i'm going to
Take a bit of the i'm going to see if i can just take off the shadow here
In fact if i'm not really, using it
um i
Want to take it out here because that's already been taken care of and if i take out the
the shadow here
I'll leave it in and i'm going to go over here to the
Layer mask, and i'm going to take it out, from this side here
And i can always, add that back in like that
So, now i'm just going to adjust
This layer i ended up
See if i can get it to look
Natural going to reference the original here
reddish hue to it
you
So there's a bunch that got included that shouldn't. Be there so i'm going to take that out
Some here is some all along
The side of the image
that
you
And it had in a bit of the shadow. Drop shadow. Because i can, see here it's very dark here not quite so much
so
Go, add in a bit of the drop shadow
around here
Hmm, not sure how. Much i like that i'll drop the opacity, and try that again
That looks a bit better it's more subtle so now, i think i'm going to add?
With this shadow, here i'm pretty happy with how it looks right now i think it matches up pretty, well with
the original i
Think i'll do what i did before i'll take, the lair
And i'll right-click
rasterize and then go into filter and
filter gallery put in a little bit of
grain
See how, that looks and then
Go, down and blur it a little bit
Cool, now that looks a bit more natural looks, like more as part of the photo
So i would, say this overall is looking pretty decent i think
aside, from the fact that the image quality is obviously better on this image so it captured a bit more detail i
Think, for the most part
This, is pretty much done?
I'm going to make a few small adjustments. And since i'm gonna come in here and i'm gonna
Crop, a little bit on my hand out
I'm actually going to blur
The background, again, here the
The shadow, again because it looks a bit too detailing bit too colorful so i think blurring it i'll take that down a little bit
I'll see if there's anything else i can, do with, my face so one thing i'm going to try
is i'm gonna, go over here and i'm going to take the blur tool, and
I'm going, to put the strength around
fifty maybe
Maybe even thirty
and i'm just gonna kind of go in and
See what it looks like if i blur some of the things within, my face to kind of reduce the detail
Kind of some of the sharp edges maybe take, those down a bit
you
Going, to that's what the saturation just a bit
So there are just a couple more things that i'd like to address before i finish this photo
The first thing, is that i notice in the new, photograph, my, eyes have a bit more of a
Blue light reflection than they do in the original photograph you can kind of see more of a
Blue tint from the flash so the way that i'm going to
Fix that, is i'm going to go to the background, go to, my healing brush tool, make
sure it's on replace i'm going to zoom in
and i'm going to hold alt and
select, my, eye
Then i'm going to come over to my layer one here of myself, and i'm just going to paste that right on
So i'm going, to put that on my other eye and zoom out and see how. That looks
Taken on and off?
see how, i like it i think that looks pretty good
Pretty, happy with that
So the other thing, is that i noticed that the light coming in on my, head here has more of a
Blue tint to it whereas the light coming over here you don't really see that blue tint
So the way that i'm going to fix that is actually by?
Creating a color, layer, so i'm going to create a color layer, above this layer here
I'm gonna, make it yellow for now
Delete layer mask holding alt i'm going to make a, new, layer mask so that one disappears
So, while the color, disappears i'm going to come in with, my brush
And i'm just gonna paint over the spot that i want to have effected which is pretty much just that because the rest is all?
A warm kind of tint it's only around here that there's that blue appearance
So now that i have it where i want it to. Be i'm going to go up to my
Blending mode and i put on soft light i think that'll be alright and now i'm going to. Adjust the color
Until it looks
So, what i can do is i can take, off the color layer to see how it looked before and how it looks now
That looks pretty, good it definitely takes, away, that blue aspect to it
I'll see if i can, adjust it even more so that it looks more orange
you
I think right, about here will be good because it's still around the same kind of luminosity the same
brightness as
The photograph without, this collar layer but it just kind of takes, away the blue and makes it more reddish
And i could even add in a little bit take down the opacity, and add in some?
around the sides here so that it's a bit more normalized i
Think, that's looking alright
Maybe even a little bit less, like that is good?
So yeah, i think that's about it this is probably as good as i can get it without really
Spending, another hour just nitpicking little things
While still being able to show. You a bit of what went into this project
Some of the things that i ran into and how i dealt with that i am of course a student as
Well and i'm learning so if there's anything that i missed in this video please leave a comment and let me know
Anything that i could, have done better that some shortcuts or just some things that i could learn, from i'm open
To, any constructive criticism i appreciate any feedback and if you are trying to get into something like
This, yourself i hope you were able to take something, away, from this video if you, enjoyed it please consider, buying, me a
Coffee, which you can
Do via the link in the description but otherwise i hope you enjoyed this video and i hope you are able to take something from
It so thank you so much for watching and have an excellent, day
(I realized after uploading that YouTube doesn't do annotations anymore, check the description for links, thanks!)
 For more infomation >> Mattarella l'Europa ed il governo italiano - Duration: 6:21.
  For more infomation >> Back to Her Roots
 For more infomation >> Suzuki S-Cross 1.6 Exclusive Clima/Cruise/Trekhaak - Duration: 1:06.
  For more infomation >> Suzuki S-Cross 1.6 Diesel Exclusive/Navigatie - Duration: 1:09.
  For more infomation >> Audi A3 Cabriolet 2.0 TFSI quattro S-line aut EXTREEM VOL!Virtual cockpit/2x s line/sport comfortsto - Duration: 1:13.
  For more infomation >> Audi Q5 3.0 TDI QUATTRO PROLINE S PANO / B&O EXPORTPRICE € 18.495,- - Duration: 1:06.
  For more infomation >> Suzuki S-Cross 1.6 BUSINESS EDITION PRO Navi | Clima | Trekhaak - Duration: 0:54.
  For more infomation >> Lyon: Deux autres immeubles s'effondrent route de Vienne, un secteur maudit ? - Duration: 2:49.
  For more infomation >> Audi A5 Sportback 1.8 TFSI 170pk PRO LINE S, Navi, Xenon Led, ROTOR, ECC - Duration: 1:12.
  For more infomation >> Toyota Verso-S 1.3 VVT-i Aspiration Automaat - Duration: 1:07.
 For more infomation >> Mercedes-Benz S-Klasse Coupé 500 4-MATIC AMG Styling Rijassistentiepakket plus - Duration: 1:10.
  For more infomation >> Últimas notícia de hoje : EDITORIAL DA FOLHA: TEMER É UM CADÁVER ENTRONADO - Duration: 2:53.
 For more infomation >> Sérum vitaminé anti-âge un puissant remède maison peut rajeunir de 20 ans n'importe quelle partie - Duration: 6:16.
  For more infomation >> Danse avec les stars 9: une animatrice emblématique aurait refusé la proposition ! - Duration: 2:56.
  For more infomation >> Audi A3 Sportback 1.2 TFSI Aut. S-Tronic Pro Line (Navi/BlueTooth) - Duration: 1:08.
  For more infomation >> Kendall Jenner en couple avec une star du basket : qui est l'heureux élu ? - Duration: 2:36.
 For more infomation >> [Official] Desperado ♠ Original Song by Pablo - Duration: 3:17.
  For more infomation >> Pokemon Let's Go Pikachu! & Let's go Eevee! - Analisis del Trailer - Duration: 4:03.
 For more infomation >> Citroën Berlingo 1.9 D 800 MARGE - Duration: 0:51.
  For more infomation >> Toyota Corolla 2.0 D TERRA , Sedan, Diesel, Airco - Duration: 0:42.
  For more infomation >> Portefeuille mobile : une manière d'accéder à vos garanties d'assurance collective de Manuvie - Duration: 1:24.
  For more infomation >> Dバックス平野、11戦連続無失点 防御率1.85、チーム連勝で10ホールド目 - Duration: 2:26.


 For more infomation >> Nouvelle technologie de refroidissement par immersion pour la microélectronique - Duration: 3:43.
  For more infomation >> Dr Maurice Mizrahi - La peur du changement (Behaalotekha) - Duration: 12:12.
  For more infomation >> Michael Douglas et Catherine Zeta-Jones, si fiers de leur fils Dylan - Duration: 1:57.
  For more infomation >> Beer tasting #10 | PAB - Pit Caribou, Sutton Brouërie, Auval - Duration: 8:04.
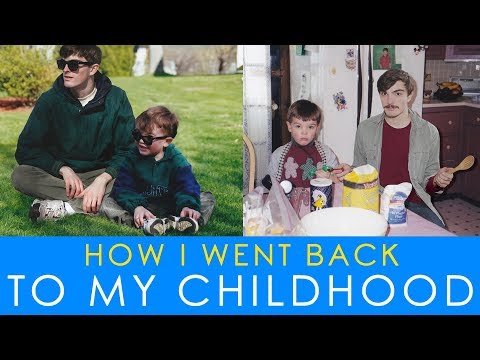
 For more infomation >> Avant l'anniversaire de Johnny Hallyday, les commerçants de St Barth n'en peuvent déjà plus - Duration: 2:48.
  For more infomation >> 生日狂樂!自慰中毒女優D奶當蛋糕 乳頭遭狗狂舔粉色現形 - Duration: 3:07.

 For more infomation >> The Tax Accountant Accordionist | Show Me Your Nerd - Duration: 5:26.
No comments:
Post a Comment