There is like a natural filter
and people choose to practice.
Why not use it ?
Why not use it if it has a practical sense ?
-------------------------------------------
learn colors with car wash a washing vehicles video for children by Kids Channel - Duration: 1:52.
YELLOW
RED
BLUE
GREEN
PINK
-------------------------------------------
8 produits qui causent le cancer et que vous devez immédiatement jeter - Random888 - Duration: 8:03. For more infomation >> 8 produits qui causent le cancer et que vous devez immédiatement jeter - Random888 - Duration: 8:03.
 -------------------------------------------
Frankenstein's Monster | Halloween Makeup Tutorial | AJ Kane - Duration: 9:37.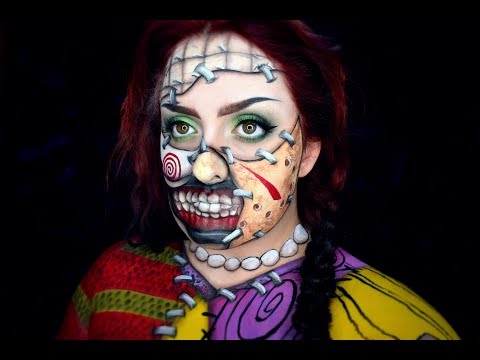
Welcome back for day 2 of my 31 Days of Halloween Series.
My version of Frankenstein's Monster was such a blast to create and I hope you dig every inch of her.
Product details and all that fun stuff will be in the video description below.
Let's get started...
I sketched out where I wanted to place every slab of character
So I could gauge how big of a portion I wanted for each one.
I decided to begin with the eyes and I knew immediately that I wanted that portion to be bride of
Bride of Frankenstein-inspired, so I first concealed around my eyes and set It with powder
And then I decided to brow-block the outer tail of my eyebrows to give that classic eyebrow she has.
So I used a washable glue stick,
applied that with a palette knife,
used a little bit of water to smooth it out,
waited 'til that dried,
powdered it,
color corrected and then concealed.
In between each layer of color corrector, I like to powder it to set it.
This way, each layer doesn't get disturbed as I add on to it,
And you can slowly watch your eyebrows disappear.
Don't forget to set it with powder at the very end, as well, to make sure the products don't
budge at all.
To fill in my brows, I'm using a taupe-y brown colour for the inner corner
and for the tail I'm using black.
I'm making my inner corners more pointy and pulling out my brow in a very dramatic way.
Now feel free to laugh...
I-uh-ended up looking a little bit too Spock-like
So I decided to change that.
So fi you get a little too "brow happy"
like me, you can use a little bit of concealer to clean that up.
Wow. I really messed those up.
To get a really crisp line of concealer,
I like to just use a small lip pencil and just manipulate the brow to where you want it to lay.
We are not doing "Bride of Spock".
Oh my God...It's so bad...
The next step is to prime my eyelids and then go over that with a cream shadow to set it.
Then I'm taking a taupe transition color and blending that into my crease,
making sure I extend the eyeshadow into more of a point on the outer corner.
Then I'm taking an army green color and blending that into my crease,
before packing a very bright green onto my lid,
and then adding some more forest greens and a hint of black to the outer corner.
Don't forget to add all these shadows on the bottom lid as well
And then you can go in with some white eyeshadow
for highlight on the inner corner and under the brow.
For eyeliner I decided not to go too crazy dramatic with a cat eye
Only a small wing, just to extend the eye a little bit.
Next you can toss on some black mascara.
As for lashes, I decided to go with the cult classic, Demi Wispies by Ardell.
The next section I'm gonna work on is Pinhead's on my upper forehead.
So I actually used a cream concealer to colour my very pale forehead.
Since his skin is gonna be sewed onto mine, you're gonna want
to make sure that there's a shadow casted over top of the Bride of Frankenstein's forehead.
And then just taking some brown and taupe eyeshadows, I'm creating all of the divots in his forehead.
As for the pins, I just used body paints.
First went in with some white body paint to create the general shape
Then used grays and a little bit of eyeshadow for definition.
Next, moving onto Jason. I knew I wanted Jason to be a big portion of my face,
Because he's dope.
So I took some cream body paint and painted on his portion.
To dirty up his mask a little bit more, I took some brown body paint on a torn-up
cosmetic sponge and just dabbed that on.
If this makes any sense, I knew I
wanted the next portion to be on top of his mask, so I made sure I casted the shadow onto his mask
around the mouth area.
Then taking some brown body paint and creating all of the holes in his mask
And then also creating the red stripe on his face.
For the highlights in the holes,
you can use some tan body paint first,
and then some white on top.
The next face I'm incorporating
is one of my favorite Horror Characters:
Twisty from American Horror Story.
First step is to take some tan body paint and paint the outer part of his mask,
And then lighten up some black body paint with some gray to paint the inside.
As for the teeth, you can just use some white body paint
or white eyeliner and map those out, before taking some dark red and
painting the gum line.
Next you're gonna want to go ham with the shading.
Shade every inch of Twisty's mask
Anywhere where you want dimension you're gonna want to shade;
so on the teeth, in the gum line...
And then I'm taking a light cream body paint and painting my nose as well, because he's got a white-ish nose.
Then I'm taking a very white cream concealer and applying that to the Jigsaw portion of my cheek.
Jigsaw's portion is, by far, the easiest one to do.
Then, you're gonna want to take that berry red body paint again
and paint on a swirl with a very thin, detail brush.
Now on to the neck.
I decided I wanted to incorporate Dr. Frank-n-Furter so I did his classic pear necklace.
You're just gonna paint circles around your neck with some white body paint
And then for the top part of his outfit, that's gonna be peeking through,
You can take some purple body paint
and then speckle random dots on it, so it looks like it's glittery.
Don't forget to shade all around the pearls and his top, as well.
Next moving onto the Sally shoulder.
I decided to pain the purple panel first
To create some variation with the purple, I took an orchid body paint and
blended that in before painting the rest of her panels a mustard yellow.
Then I'm just adding a little bit of shading here and there.
before creating the VERY "Tim Burton swirls" on the purple portion.
And the wiggly stripes on the yellow.
Sally also has some black stitches on her outfit so I added those as well.
For the other shoulder, I decided to incorporate the classic Freddy Krueger.
His sweater is super simple; you're just gonna paint the red and olive green stripes
before taking some black eyeshadow on a brush and stamping in all the little stitches in a brick pattern.
Now to connect all these Bad Boys together...
I'm first taking some white body paint to map out where I want to the big stitches to be.
I'm just adding those in places where I see fit, and then I decided I wanted them to be more like
staples...more "heavy duty"
So I painted them all silver
and then I added all the shading.
Make sure you only shade the underbellies of all the staples and where they're going to 'dig in'
And then you can take some white body paint and highlight the upper portion of them as well.
And that's it.
You've become a pretty wicked monster.
See you guys tomorrow...
No comments:
Post a Comment